Summary of steps
- Check VirtualBox settings
- Install Gazebo
- Whetting appetite: Car Demo
- Gazebo concepts
- Gazebo architecture
- Understanding the GUI
- Exercise 1
- Exercise 2
- Control prius using a Joystick
Check VirtualBox settings
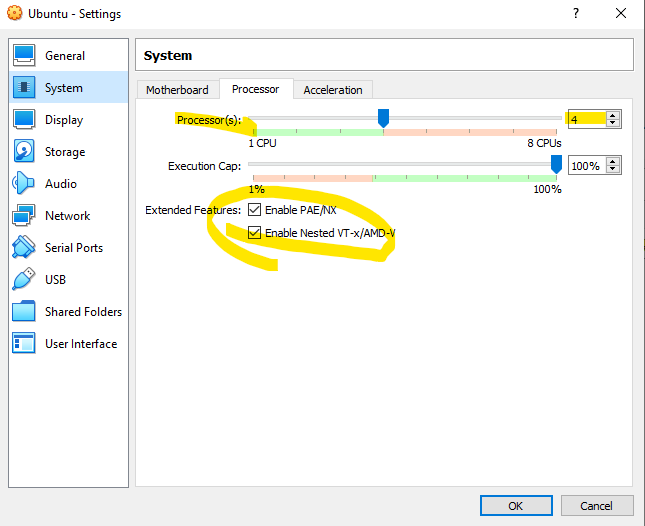
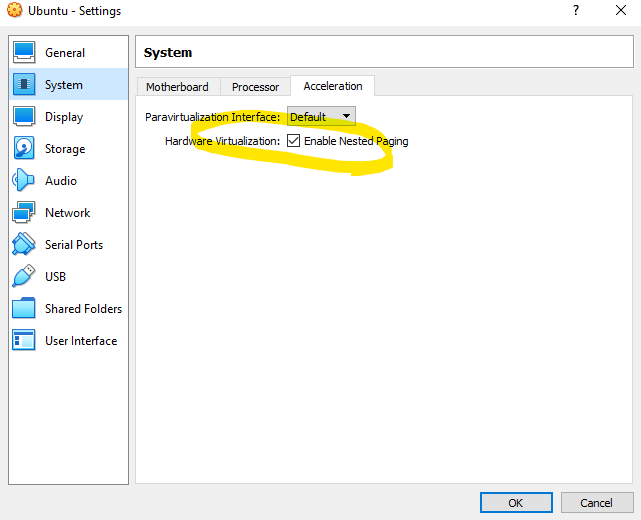
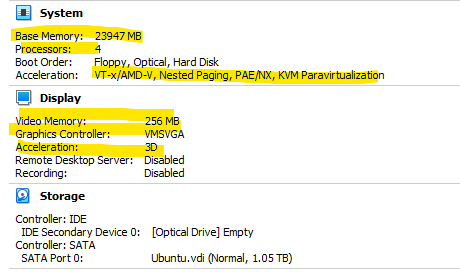
Unfortunately due to global chip shortage, we will not be able to work with real jetbot. So we will work a car in a Gazebo simulation. Gazebo is 3D simulation engine and works best with graphics card and 3D acceleration. However, 3D acceleration support in virtualbox is experimental and it may or may not work. In any case, we need a lot of resources for the virtualbox so make sure that you have the following settings in virtualbox. To changes these settings you will have to shutdown your Ubuntu virtual machine.
Recommended settings
We should be able to use both the virtual machines at the same time. So make sure that you are not exceeding
- Laptop Bios: Make sure VT-x/AMD-V is enabled in your Laptop’s bios.
- Disable Hyper-V in windows: Windows instructions
-
Allocate a lot of Memory to VirtualBox: 75% of your available memory in the laptop.
-
CPUs: 50% of the available CPUs in your laptop.
-
Acceleration:
-
Display (max Video memory, enable 3D aceleration):
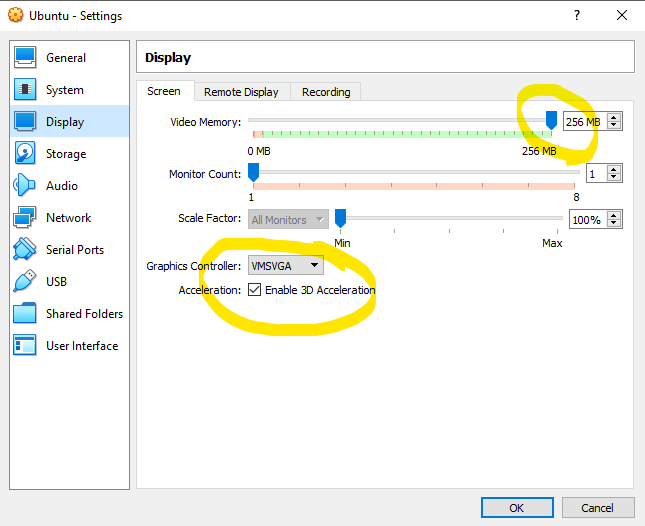
In the end, this is how my virtual machine settings look like
Checks performance of 3D acceleration from inside Ubuntu virtual machine
- Boot the Ubuntu virtual machine
-
Make sure Virtualbox Guest additions is installed. Run the following command.
lsmod | grep vboxI see the following output on my machine. You should see vboxguest and vboxvideo.
$ lsmod | grep vbox vboxsf 77824 1 vboxvideo 36864 0 drm_ttm_helper 16384 1 vboxvideo vboxguest 368640 6 vboxsf ttm 69632 3 vmwgfx,vboxvideo,drm_ttm_helper drm_kms_helper 253952 2 vmwgfx,vboxvideo drm 557056 9 vmwgfx,drm_kms_helper,vboxvideo,drm_ttm_helper,ttm - Running 3D tests to see performance
   sudo  apt install   glmark2
   glmark2
You should see 3D rendering of different objects and frame-rates being displayed. I get a “Segmentation fault”. It is better if you do not get it. I get FPS around 200-400. Higher is better.
   $ glmark2
=======================================================
    glmark2 2021.02
=======================================================
    OpenGL Information
    GL_VENDOR:     VMware, Inc.
    GL_RENDERER:   SVGA3D; build: RELEASE;  LLVM;
    GL_VERSION:    2.1 Mesa 21.0.3
=======================================================
[build] use-vbo=false: FPS: 262 FrameTime: 3.817 ms
[build] use-vbo=true: FPS: 357 FrameTime: 2.801 ms
[texture] texture-filter=nearest: FPS: 372 FrameTime: 2.688 ms
[texture] texture-filter=linear: FPS: 346 FrameTime: 2.890 ms
Segmentation fault (core dumped)

Install Gazebo
Gazebo is popular open-source robotics simulator with good ROS support. We will install gazebo packages:
sudo apt install ros-noetic-gazebo-ros-pkgs
Check if gazebo is installed.
You should be able launch gazebo from a terminal using gazebo command.
gazebo

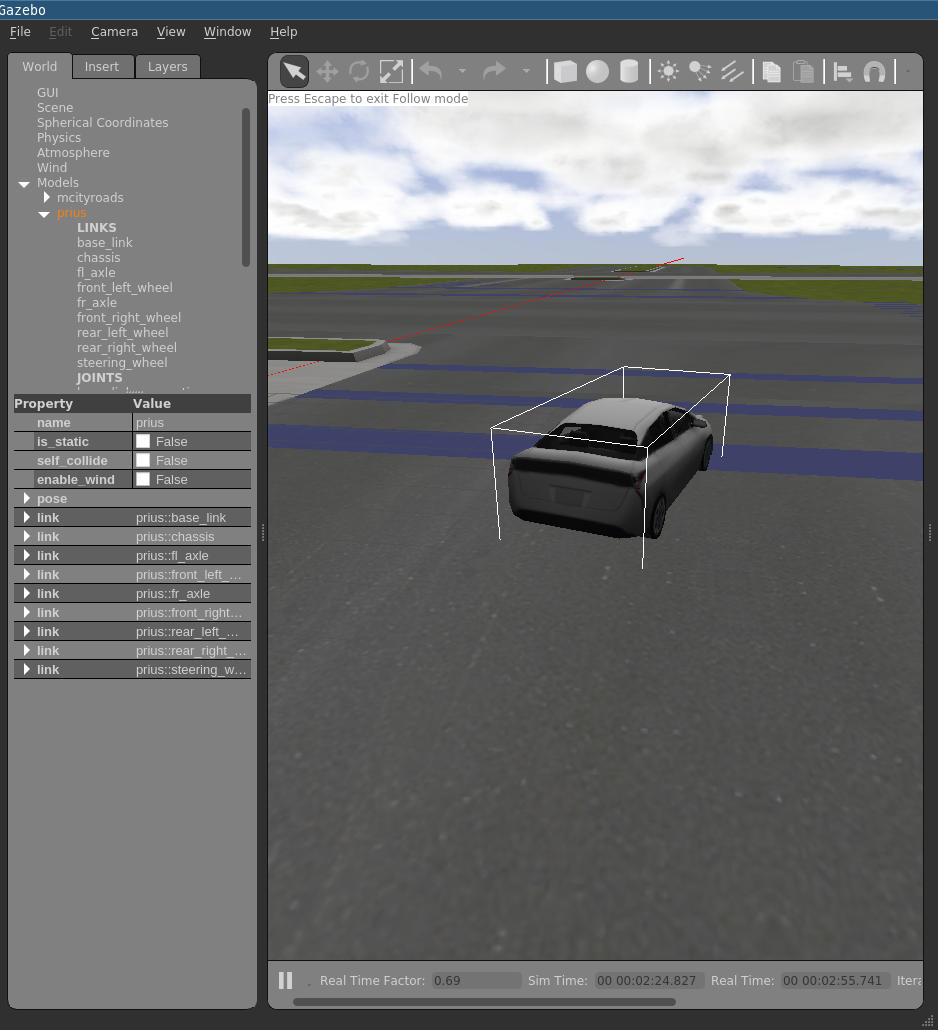
Whetting appetite: Car Demo
What can we do with gazebo?
Download Car Demo
- Download car demo from following github repository:
https://github.com/wecacuee/car_demo/tree/noetic-light
-
You can either use git or click on “Code” -> “Download Zip”
-
Move and unzip it to a catkin workspace
   mkdir -p ~/02-28/catkin_ws/src
   mv ~/Downloads/car_demo-noetic-light.zip ~/02-28/catkin_ws/src
   cd ~/02-28/catkin_ws/src
   unzip car_demo-noetic-light.zip
   mv car_demo-noetic-light car_demo
Compile Car demo
- Install necessary packages
sudo apt install ros-noetic-fake-localization ros-noetic-robot-state-publisher ros-noetic-joy
- Compile the catkin workspace
   cd ~/02-28/catkin_ws/
   source  /opt/ros/noetic/setup.bash
   catkin_make
You should see the following messages in the end:
[ 88%] Building CXX object car_demo-noetic-light/car_demo/CMakeFiles/PriusHybridPlugin.dir/plugins/PriusHybridPlugin.cc.o
[100%] Linking CXX shared library /tmp/lab-02-28-catkin_ws/devel/lib/libPriusHybridPlugin.so
[100%] Built target PriusHybridPlugin
Run car demo
- Roslaunch demo-light.launch
source devel/setup.bash
roslaunch car_demo demo-light.launch
- To move the car, you can directly publish prius_msgs/Control type messages. In another terminal, you can set throttle to 1000 and shift_gear to 2 (forward)
  rostopic pub /prius prius_msgs/Control "header:
  seq: 0
  stamp: {secs: 0, nsecs: 0}
  frame_id: ''
throttle: 1000.0
brake: 0.0
steer: 0.0
shift_gears: 2"
The car will keep moving until the mesh ends. Or you can send the brake message
  rostopic pub /prius prius_msgs/Control "header:
  seq: 0
  stamp: {secs: 0, nsecs: 0}
  frame_id: ''
throttle: 0.0
brake: 100.0
steer: 0.0
shift_gears: 0"
Gazebo concepts
(The following are a copy of instructions from here) This page describes each of the items involved in running a Gazebo simulation.
World Files
The world description file contains all the elements in a simulation, including robots, lights, sensors, and static objects. This file is formatted using SDF (Simulation Description Format), and typically has a .world extension.
The Gazebo server (gzserver) reads this file to generate and populate a world.
A number of example worlds are shipped with Gazebo. These worlds are installed in <install_path>/share/gazebo-<version>/worlds;
you can also see them in the source code.
Model Files
A model file uses the same SDF format as world files, but should only contain a single <model> ... </model>. The purpose of these files is to facilitate model reuse, and simplify world files. Once a model file is created, it can be included in a world file using the following SDF syntax:
<include>
  <uri>model://model_file_name</uri>
</include>
A number of models are provided in the online model database (in previous versions, some example models were shipped with Gazebo). Assuming that you have an Internet connection when running Gazebo, you can insert any model from the database and the necessary content will be downloaded at runtime.
Read more about model files here.
Environment Variables
Gazebo uses a number of environment variables to locate files, and set up communications between the server and clients. Default values that work for most cases are compiled in. This means you don’t need to set any variables.
Here are the variables:
GAZEBO_MODEL_PATH: colon-separated set of directories where Gazebo will search for models
GAZEBO_RESOURCE_PATH: colon-separated set of directories where Gazebo will search for other resources such as world and media files.
GAZEBO_MASTER_URI: URI of the Gazebo master. This specifies the IP and port where the server will be started and tells the clients where to connect to.
GAZEBO_PLUGIN_PATH: colon-separated set of directories where Gazebo will search for the plugin shared libraries at runtime.
GAZEBO_MODEL_DATABASE_URI: URI of the online model database where Gazebo will download models from.
These defaults are also included in a shell script:
source /usr/share/gazebo/setup.sh
If you want to modify Gazebo’s behavior, e.g., by extending the path it searches for models, you should first source the shell script listed above, then modify the variables that it sets.
Gazebo Server
The server is the workhorse of Gazebo. It parses a world description file given on the command line, and then simulates the world using a physics and sensor engine.
The server can be started using the following command. Note that the server does not include any graphical interface; it’s meant to run headless.
gzserver <world_filename>
The <world_filename> can be:
-
relative to the current directory,
-
an absolute path, or
-
relative to a path component in
GAZEBO_RESOURCE_PATH. -
worlds/<world_name>, where<world_name>is a world that is installed with Gazebo
For example, to use the empty_sky.world which is shipped with Gazebo, use the following command
gzserver worlds/empty_sky.world
Graphical Client
The graphical client connects to a running gzserver and visualizes the elements. This is also a tool which allows you to modify the running simulation.
The graphical client is run using:
gzclient
Server + Graphical Client in one
The gazebo command combines server and client in one executable. Instead of running gzserver worlds/empty.world and then gzclient, you can do this:
gazebo worlds/empty_sky.world
Plugins
Plugins provide a simple and convenient mechanism to interface with Gazebo. Plugins can either be loaded on the command line, or specified in an SDF file (see the SDF format).
Plugins specified on the command line are loaded first, then plugins specified in the SDF files are loaded. Some plugins are loaded by the server, such as plugins which affect physics properties, while other plugins are loaded by the graphical client to facilitate custom GUI generation.
Example of loading a system plugin via the command line:
gzserver -s <plugin_filename>
The -s flag indicates it is a system plugin, and <plugin_filename> is the
name of a shared library found in GAZEBO_PLUGIN_PATH.
For example, to load the RestWebPlugin that ships with Gazebo:
gzserver --verbose -s libRestWebPlugin.so
The same mechanism is used by the graphical client, the supported command line flags are the following:
For example, to load the TimerGUIPlugin:
gzclient --gui-client-plugin libTimerGUIPlugin.so
For more information refer to the plugins overview page.
Gazebo architecture
(this is copy of tutorial here)
Introduction
Gazebo uses a distributed architecture with separate libraries for physics simulation, rendering, user interface, communication, and sensor generation. Additionally, gazebo provides two executable programs for running simulations:
-
a server
gzserverfor simulating the physics, rendering, and sensors -
a client
gzclientthat provides a graphical interface to visualize and interact with the simulation
The client and server communicate using the gazebo communication library.
Communication Between Processes
The communication library currently uses the open source
Google Protobuf for the message serialization
and boost::ASIO for the transport mechanism.
It supports the publish/subscribe communication paradigm.
For example, a simulated world publishes body pose updates,
and sensor generation and GUI will consume these messages to produce output.
This mechanism allows for introspection of a running simulation, and provides a convenient mechanism to control aspects of Gazebo.
System
Gazebo Master
This is essentially a topic name server. It provides name lookup, and topic management. A single master can handle multiple physics simulations, sensor generators, and GUIs.
Communication Library
- Dependencies: Protobuf and boost::ASIO
- External API: Support communication with Gazebo nodes over named topics
- Internal API: None
- Advertised Topics: None
- Subscribed Topics: None
This library is used by almost all subsequent libraries. It acts as the communication and transport mechanism for Gazebo. It currently supports only publish/subscribe, but it is possible to use RPC with minimal effort.
Physics Library
- Dependencies: Dynamics engine (with internal collision detection)
- External API: Provides a simple and generic interface to physics simulation
- Internal API: Defines a fundamental interface to the physics library for 3rd party dynamic engines.
The physics library provides a simple and generic interface to fundamental simulation components, including rigid bodies, collision shapes, and joints for representing articulation constraints. This interface has been integrated with four open-source physics engines:
A model described in the Simulation Description Format (SDF) using XML can be loaded by each of these physics engines. This provides access to different algorithm implementations and simulation features.
Rendering Library
- Dependencies: OGRE
- External API: Allows for loading, initialization, and scene creation
- Internal API: Store metadata for visualization, call the OGRE API for rendering.
The rendering library uses OGRE to provide a simple interface for rendering 3D scenes to both the GUI and sensor libraries. It includes lighting, textures, and sky simulation. It is possible to write plugins for the rendering engine.
Sensor Generation
- Dependencies: Rendering Library, Physics Library
- External API: Provide functionality to initialize and run a set of sensors
- Internal API: TBD
The sensor generation library implements all the various types of sensors, listens to world state updates from a physics simulator and produces output specified by the instantiated sensors.
GUI
- Dependencies: Rendering Library, Qt
- External API: None
- Internal API: None
The GUI library uses Qt to create graphical widgets for users to interact with the simulation. The user may control the flow of time by pausing or changing time step size via GUI widgets. The user may also modify the scene by adding, modifying, or removing models. Additionally there are some tools for visualizing and logging simulated sensor data.
Plugins
The physics, sensor, and rendering libraries support plugins. These plugins provide users with access to the respective libraries without using the communication system.
Understanding the GUI
(the instructions below are a copy of instructions here)
User Interface
This is an introduction to the Gazebo Graphical User Interface, or GUI. We will learn interface basics like what the buttons do and how to navigate in the scene.
GUI
This is what you should see:

Note that the Gazebo interface consists of multiple sections, explained below.
The Scene
The Scene is the main part of the simulator. This is where the simulated objects are animated and you interact with the environment.

The Panels
Both side panels—right and left—can be displayed, hidden or resized by dragging the bar that separates them from the Scene.

Left Panel
The left panel appears by default when you launch Gazebo. There are three tabs in the panel:
-
WORLD: The World tab displays the models that are currently in the scene, and allows you to view and modify model parameters, like their pose. You can also change the camera view angle by expanding the “GUI” option and tweaking the camera pose.
-
INSERT: The Insert tab is where you add new objects (models) to the simulation. To see the model list, you may need to click the arrow to expand the folder. Click (and release) on the model you want to insert, and click again in the Scene to add it.
-
LAYERS: The Layers tab organizes and displays the different visualization groups that are available in the simulation, if any. A layer may contain one or more models. Toggling a layer on or off will display or hide the models in that layer.
This is an optional feature, so this tab will be empty in
most cases. To learn more about Layers, check out the
[Visibility Layers](http://gazebosim.org/tutorials?tut=visual_layers&cat=build_robot)
tutorial.
Right Panel (hidden by default)
The right panel is hidden by default. Click and drag the bar to open it. The right panel can be used to interact with the mobile parts of a selected model (the joints). If there are no models selected in the Scene, the panel does not display any information.
The Toolbars
The Gazebo interface has two Toolbars. One is located just above the Scene, and the other is just below.
Upper Toolbar
The main Toolbar includes some of the most-used options for interacting with the simulator, such as buttons to: select, move, rotate, and scale objects; create simple shapes (e.g. cube, sphere, cylinder); and copy/paste. Go ahead and play around with each button to see how it behaves.

Select mode: Navigate in the scene
Translate mode: Select models you want to move
Rotate mode: Select models you want to rotate
Scale mode: Select models you want to scale
Undo/Redo: Undo/redo actions in the scene
Simple shapes: Insert simple shapes into the scene
Lights: Add lights to the scene
Copy/paste: Copy/paste models in the scene
Align: Align models to one another
Snap: Snap one model to another
Change view: View the scene from various angles
Bottom Toolbar
The Bottom Toolbar displays data about the simulation, like the simulation time and its relationship to real-life time. “Simulation time” refers to how quickly time is passing in the simulator when a simulation is running. Simulation can be slower or faster than real time, depending on how much computation is required to run the simulation.
“Real time” refers to the actual time that is passing in real life as the simulator runs. The relationship between the simulation time and real time is known as the “real time factor” (RTF). It’s the ratio of simulation time to real time. The RTF is a measure of how fast or slow your simulation is running compared to real time.
The state of the world in Gazebo is calculated once per iteration. You can see the number of iterations on the right side of the bottom toolbar. Each iteration advances simulation by a fixed number of seconds, called the step size. By default, the step size is 1 ms. You can press the pause button to pause the simulation and step through a few steps at a time using the step button.

The Menu
Like most applications, Gazebo has an application menu up top. Some of the menu options are duplicated in the Toolbars or as right-click context menu options in the Scene. Check out the various menus to familiarize yourself.

NOTE: Some Linux desktops hide application menus. If you don’t see the menus, move your cursor to the top of the application window, and the menus should appear.

Mouse Controls
The mouse is very useful when navigating in the Scene. We highly recommend using a mouse with a scroll wheel. Below are the basic mouse operations for navigating in the Scene and changing the view angle.
Right-clicking on models will open a context menu with various options. Right-click on a model now to see what’s available.

Exercise 1
- Find the world file used in car demo. (Hint: find the demo.launch file and look for the path to the world file.)
Exercise 2
Browse through different models available in the “Insert” section of Gazebo and create a world of your own. Replace the world file in the demo-light.launch file and re-run the car demo.
Control prius using a Joystick
- To connect joystick to the virtual machine, click Devices > USB > “ShanWan USB for Windows”.
Connect your joystick to your computer. Now let’s see if Linux recognized your joystick.
ls /dev/input/
You will see a listing of all of your input devices similar to below:
by-id    event0  event2  event4  event6  js1   mouse0
by-path  event1  event3  event5  js0     js2   mice  mouse1
As you can see above, the joystick devices are referred to by jsX ; in this case, our joystick could be js0, js1 or js2. We have to try them all one-by-one. Let’s make sure that the joystick is working.
sudo jstest /dev/input/jsX
You will see the output of the joystick on the screen. Move the joystick around to see the data change. Some of the joysticks are remappings of keyboards or mouse. Their values will not change as you move the joystick around.
    Driver version is 2.1.0.
    Joystick (Logitech Logitech Cordless RumblePad 2) has 6 axes (X, Y, Z, Rz, Hat0X, Hat0Y)
    and 12 buttons (BtnX, BtnY, BtnZ, BtnTL, BtnTR, BtnTL2, BtnTR2, BtnSelect, BtnStart, BtnMode, BtnThumbL, BtnThumbR).
    Testing ... (interrupt to exit)
    Axes:  0:     0  1:     0  2:     0  3:     0  4:     0  5:     0 Buttons:  0:off  1:off  2:off  3:off  4:off  5:off  6:off  7:off  8:off  9:off 10:off 11:off
For me, /dev/input/js2 worked, which means its values changed when fiddled with joystick. I will use /dev/input/js2 going forward.
Now let’s make the joystick accessible for the ROS joy node.
rosrun joy joy_node _dev:=/dev/input/jsX
You will see something similar to:
    [ INFO] 1253226189.805503000: Started node [/joy], pid [4672], bound on [aqy], xmlrpc port [33367], tcpros port [58776], logging to [/u/mwise/ros/ros/log/joy_4672.log], using [real] time

    [ INFO] 1253226189.812270000: Joystick device: /dev/input/js0

    [ INFO] 1253226189.812370000: Joystick deadzone: 2000
Now in a new terminal you can rostopic echo the joy topic to see the data from the joystick:
rostopic echo /joy
As you move the joystick around, you will see something similar to :
---
header:
  seq: 9414
  stamp:
    secs: 1325530130
    nsecs: 146351623
  frame_id: ''
axes: [-0.0038758506998419762, -0.0038453321903944016, -0.0, -0.999969482421875, 0.0, 0.0]
buttons: [0, 0, 0, 0, 0, 0, 0, 0, 0, 0, 0, 0]
---
header:
  seq: 9415
  stamp:
    secs: 1325530130
    nsecs: 146351623
  frame_id: ''
axes: [-0.0038758506998419762, -0.0038453321903944016, -0.0, -0.999969482421875, 0.0, 0.0]
buttons: [0, 0, 0, 0, 0, 0, 0, 0, 0, 0, 0, 0]
---
header:
  seq: 9416
  stamp:
    secs: 1325530130
    nsecs: 146351623
  frame_id: ''
axes: [-0.0038758506998419762, -0.0038453321903944016, -0.0, -0.999969482421875, 0.0, 0.0]
buttons: [0, 0, 0, 0, 0, 0, 0, 0, 0, 0, 0, 0]
---
Exercise 3
Once you have identified which joystick device works for you /dev/input/jsX. Replace the appropriate line in demo-light.launch and control the prius with the joystick.