Summary of steps
- Accessing images from Gazebo car camera
- Exercise 4: How to find camera matrix of the gazebo camera
- Exercise 5: Generate Birds Eye View (BEV) image
Accessing images from Gazebo car camera
Repeat the steps of Lab 5, get the gazebo and car running.
sudo apt install ros-noetic-gazebo-ros-pkgs
cd ~/02-28/catkin_ws/
source /opt/ros/noetic/setup.bash
catkin_make
source devel/setup.bash
roslaunch car_demo demo-light.launch
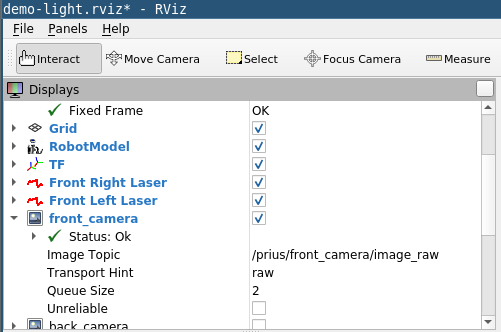
You should be able to see the front camera image in the rviz in a Panel named front_camera.

This panel is displayed due to the Rviz subscribing to the topic, /prius/front_camera/image_raw. Go to the “Displays” panel and click on front_camera to see its properties and the topic name.
In the TurtleSim Tutorial we have used rostopic list, rostopic info, rostopic type to inspect the topics. Let us do the same with the topic: /prius/front_camera/image_raw
cd ~/02-28/catkin_ws/
source devel/setup.bash
rostopic list
rostopic type /prius/front_camera/image_raw
rostopic info /prius/front_camera/image_raw
Exercise 1
What is the ROS message Type for the topic /prius/front_camera/image_raw? Use rosmsg show to show the fields in the message type. Submit the output at the end of the lab.
Exercise 2: Viewing the image through image_view
In Lab week 4, we used image_view to view our laptop camera images. We can use a variation of the same command with a different image:=. You can also refer to the image_view documentation.
In another terminal, Run the image_view node to view the topic /prius/front_camera/image_raw . Submit the full command and screenshot by the end of the lab.
Image_view has a nice feature that it saves the current frame as a png file if you right click on the window. Right click on the window and save a frame. It will display on the terminal:
..
[ INFO] [1647849470.833080733, 971.309000000]: Saved image frame0000.jpg
Open the image. In another terminal, go the folder and open it using xdg-open
xdg-open frame0000.jpg
Exercise 3: Writing a custom subscriber to the topic
In the TurtleSim tutorial, we learnt how to write a subscriber to a topic.
-
Write a subscriber to the topic
/prius/front_camera/image_raw. Start from the subscriber code provided in the tutorial. Save the file as~/02-28/catkin_ws/src/car_demo/car_demo/nodes/image_to_bird_eye_view.cpp - Change the topic to
/prius/front_camera/image_rawinstead of “chatter”. - Change the topic message type from
std_msgs::Strings::ConstPtrto<A variation of message type from Exercise 2>::ConstPtr. - You will need to include
#include "<message type from Exercise 2>.h"instead of#include "std_msgs/String.h". - Since message
std_msgs::Stringhad adatafield, you were able to printmsg->data.c_str(). What fields does “message type from exercise 2” have? (output ofrosmsg show). UseROS_INFOto print the height, width and encoding of the image. - Make other necessary changes to subscribe the topic
/prius/front_camera/image_raw. -
Use the following two function
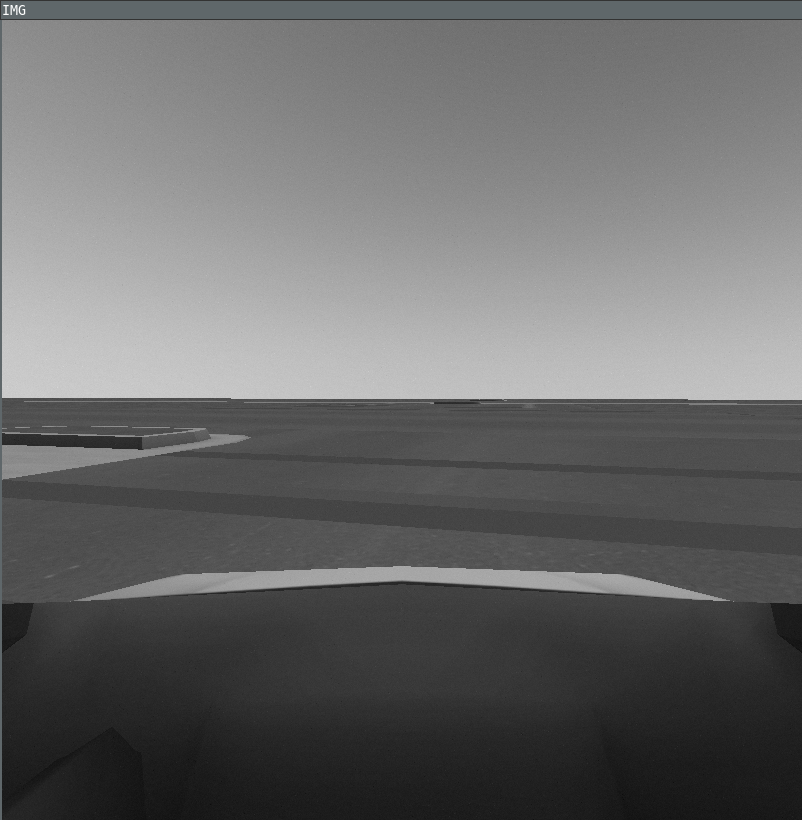
convert_image_msg_to_eigento convert frommessage type from exercise to 2intoEigen::MatrixXdtype; and theneigen_imshowvisualize theEigen::MatrixXdimage.// Make sure you have installed the required packages: // sudo apt install libopencv-dev libeigen3-dev ros-noetic-cv-bridge // Additional header files required for conversion #include <Eigen/Dense> #include <cv_bridge/cv_bridge.h> #include <sensor_msgs/image_encodings.h> #include <opencv2/imgproc.hpp> #include <opencv2/core/eigen.hpp> #include <opencv2/highgui.hpp> /** * Convert ROS's sensor_msgs::Image::ConstPtr to Eigen's Eigen::MatrixXd * * Example usage: (if msg is of type sensor_msgs::Image::ConstPtr): * Eigen::MatrixXd eigen_image; * convert_image_msg_to_eigen(msg, eigen_image); */ void convert_image_msg_to_eigen(const sensor_msgs::Image::ConstPtr& msg, Eigen::MatrixXd& returned_eigen_image) { // http://wiki.ros.org/cv_bridge/Tutorials/UsingCvBridgeToConvertBetweenROSImagesAndOpenCVImages cv_bridge::CvImageConstPtr cv_image_ptr; try { cv_image_ptr = cv_bridge::toCvShare( msg, sensor_msgs::image_encodings::RGB8); } catch (cv_bridge::Exception& e) { ROS_FATAL("cv_bridge exception: %s", e.what()); return; } // Convert color image to gray scale cv::Mat gray_image; cv::cvtColor(cv_image_ptr->image, gray_image, cv::COLOR_RGB2GRAY); // Scale the image doubles between 0 and 1 cv::Mat gray_image_double; gray_image.convertTo(gray_image_double, CV_64FC1); gray_image_double /= 255.0; // OpenCV -> Eigen cv::cv2eigen(gray_image_double, returned_eigen_image); } /** * This function visualizes the Eigen image. * * Example usage: * * eigen_imshow(eigen_image); * */ void eigen_imshow(const Eigen::MatrixXd& img) { // Eigen -> OpenCV cv::Mat cv_img; cv::eigen2cv(img, cv_img); cv::imshow("IMG", cv_img); cv::waitKey(10); } -
You will need to replace or add the following lines to
~/02-28/catkin_ws/src/car_demo/car_demo/CMakeLists.txt.find_package(catkin REQUIRED COMPONENTS gazebo_ros prius_msgs cv_bridge ) find_package(OpenCV 4.2 REQUIRED imgproc highgui) find_package(Eigen3 3.3 REQUIRED) catkin_package( # INCLUDE_DIRS include # LIBRARIES gazebo_radar_plugin CATKIN_DEPENDS gazebo_ros prius_msgs cv_bridge # DEPENDS system_lib ) include_directories(include ${catkin_INCLUDE_DIRS} ${GAZEBO_INCLUDE_DIRS} ${SDFormat_INCLUDE_DIRS} ${OpenCV_INCLUDE_DIRS}) add_executable(image_to_bird_eye_view nodes/image_to_bird_eye_view.cpp) target_link_libraries(image_to_bird_eye_view ${catkin_LIBRARIES} Eigen3::Eigen ${OpenCV_LIBRARIES}) -
You will need to add the following lines to
~/02-28/catkin_ws/src/car_demo/car_demo/package.xmlclose to where other<depend>lines are.<depend>cv_bridge</depend> - How do you compile a workspace? How do you source the environment of the catkin_ws? How do you
rosruna node? What is the package name that we are working with? What is the node name in theCMakeLists.txt? Compile and run the node. Submit the cpp file, a screenshot and the command used to run the node.
Exercise 4: How to find camera matrix of the gazebo camera
- Use
rostopic info,rostopic echoand subsequentlyrosmsg showon the topic/prius/front_camera/camera_info. - Look at the documentation of
sensor_msgs/CameraInfomessage type - Use
rostopic echoon/prius/front_camera/camera_infoon to find the camera calibratrion matrix (K) for the gazebo camera.
Exercise 5: Generate Birds Eye View (BEV) image
-
Modify
~/02-28/catkin_ws/src/car_demo/car_demo/nodes/image_to_bird_eye_view.cppto loop over every pixel of the image,coutthe gray scale intensity of image at every pixel. The higher the value, the brighter the pixel. Black is 0, and white is 1.for (int row = 0; row < eigen_image.rows(); ++row) { for (int col = 0; col < eigen_image.cols(); +col) { ROS_INFO_STREAM("I(" << row << ", " << col << ") = " << eigen_image(row, col)); } } -
There is a lot of printing going on. This is going to hang your node. If Ctrl+C does not work use
Ctrl+\to kill the node. We are going to print the pixel only if the row is divisible by 100 and col is divisible by 100for (int row = 0; row < eigen_image.rows(); ++row) { for (int col = 0; col < eigen_image.cols(); +col) { if (row % 100 == 0 && col % 100 == 0) { ROS_INFO_STREAM("I(" << row << ", " << col << ") = " << eigen_image(row, col)); } } } -
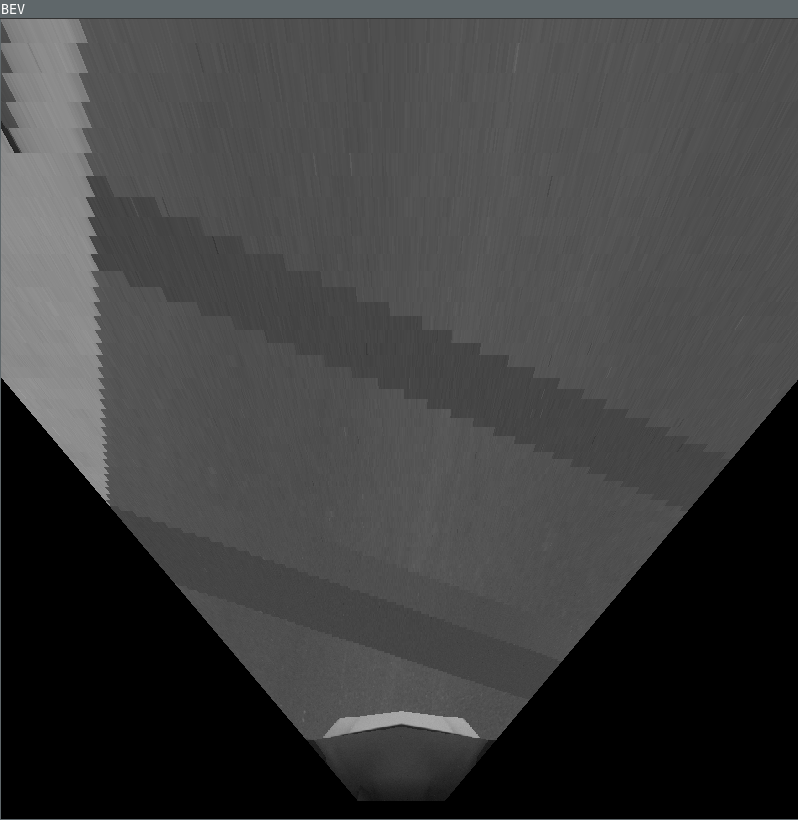
Delete the above lines of code for printing pixel values. Assume the camera height from the ground be 1.4 meters. Let us try to find out the image from a camera that is looking downwards and is at height of 15.4 from ground the and 14m directly in front of the car camera. Get the K matrix from Exercise 4. Find the birds eye view image by filling in the formulas in the following code. You have to implement the following three steps in the code.
- \[X_b = h_b K^{-1}u_b\]
- \[X_f = R^f_b X_b + t_b^f\]
- \[u_f = K X_f\]
Here \(u_b \in \mathbb{P}^2\) is a point on BEV image and \(u_f \in \mathbb{P}^2\) is a point on Front camera image. \(h_b = 15.4\) is the height of BEV camera from the ground, \(K\) is camera calibration matrix, \(R^f_b\) is the rotation matrix that rotates points from BEV camera to front camera and \(t^f_b\) is the corresponding translation (also the origin of the BEV camera in front camera frame.)
 Eigen::MatrixXd birds_eye_view_image(eigen_image.rows(),
                                    eigen_image.cols());
 birds_eye_view_image.setZero();

 double camera_height = 1.4; // meters
 Eigen::Matrix3d K;
 K << 1, 0, 0,
 0, 1, 0,
 0, 0, 1; // TODO: Replace this from Exercise 4
 Eigen::Matrix3d Kinv = K.inverse();
 Eigen::Matrix3d R;
 R << 1, 0, 0,
     0, 0, 1,
     0, -1, 0; //  Rotation for camera looking downwards
 Eigen::Vector3d t;
 t << 0, -14, 14; // Camera moved 14m upwards (negative Y-axis), 14 forwards (Z-axis)
 double bev_height = -t(1) +  camera_height; // BEV camera height
 for (int bev_row = 0; bev_row < birds_eye_view_image.rows(); ++bev_row) {
     for (int bev_col = 0; bev_col < birds_eye_view_image.cols(); ++bev_col)  {
         u_bev << bev_col + 0.5, bev_row + 0.5, 1;
         Eigen::Vector3d lambda_X_bev;// TODO: Initialize with correct formula
         Eigen::Vector3d X_bev;  // TODO: Find the 3D position of the point in bev coordinate frame assuming the road plane is Z=15.4m
         Eigen::Vector3d X; // TODO: Rotate and translate X_bev into front_camera frame
         Eigen::Vector3d lambda_u; // TODO: Project X to the front_camera  image
         Eigen::Vector3d u = lambda_u / lambda_u(2);
         int col = (int) u(0);
         int row = (int) u(1);
         if (0 <= row &&  row < eigen_image.rows()
             &&  0 <= col &&  col < eigen_image.cols()) {
             birds_eye_view_image(bev_row, bev_col) = eigen_image(row, col);
         }
     }
 }

 eigen_imshow(birds_eye_view_image, "BEV");
Modify the subscriber code so that you see two windows like this:
-
Move the car around using joystick. Change the height of bird-eye-view camera. You might have to move the camera forward as well to get more view. Submit 5 screenshots with different heights and of different locations in the M-city.
-
(Optional: Extra credit for this) Can you reduce the number of matrix multiplications by using a Homography matrix? Combine the following steps of into a single matrix operation \(u_f = H u_b\).
- \[X_b = h_b K^{-1}u_b\]
- \[X_f = R^f_b X_b + t_b^f\]
- \[u_f = K X_f\]
Hint: Since the 3rd coordinate of \(u_b\) is known to be 1, so we can construct a 3x3 matrix such that \([0_3, 0_3, t^f_b] u_b = t^f_b\), where \(0_3\) is 3x1 vector of zeros. Then you can write \(X_f\) as a single matrix multiplication with \(u_b\). \(X_f = (R^f_b h_bK^{-1} + [0_3, 0_3, t_b^f])u_b\).