
We will learn how to run Jupyter notebook on ACG Katahdin and access it on your laptop by port forwarding.
Table of Contents
- Setup VPN
- SSH to Katahdin
- Load anaconda3 module
- Initialize Conda
- Run Jupyter notebook
- TCP/UDP ports
- Port forwarding
- Accessing Jupyter notebook on your laptop
- Uploading
Python_1.ipynb - Alternative Jupyter Lab interface
Setup VPN
Instructions here: vpn.maine.edu
Click on “Remote Access VPN” and then follow instructions for your operating system.
SSH to Katahdin
Next, ssh to katahdin.acg.maine.edu. Replace vdhiman with your own
username that you got in the email from Steve. For different operating
systems, we have different instructions. For Windows, we have two options; use
PowerShell or Putty.
For Mac and Linux
vdhiman@office-desktop:~$ ssh [email protected]
Last login: Sat Jan 21 13:37:12 2023 from jx3cth3.um.maine.edu
vdhiman@katahdin:~$
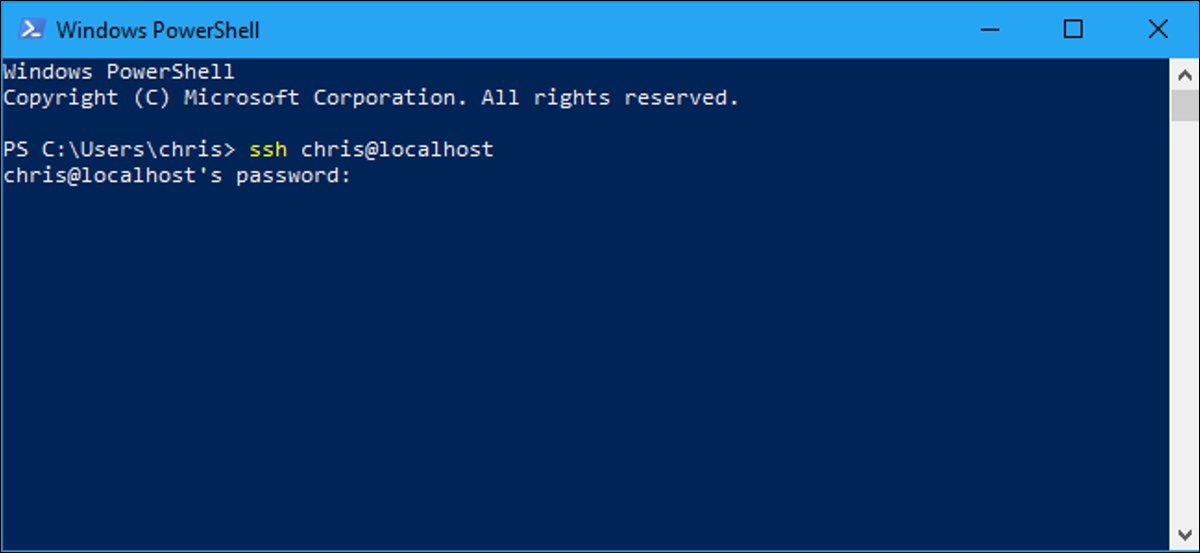
For Windows PowerShell
Instructions from here: Tutorials ssh
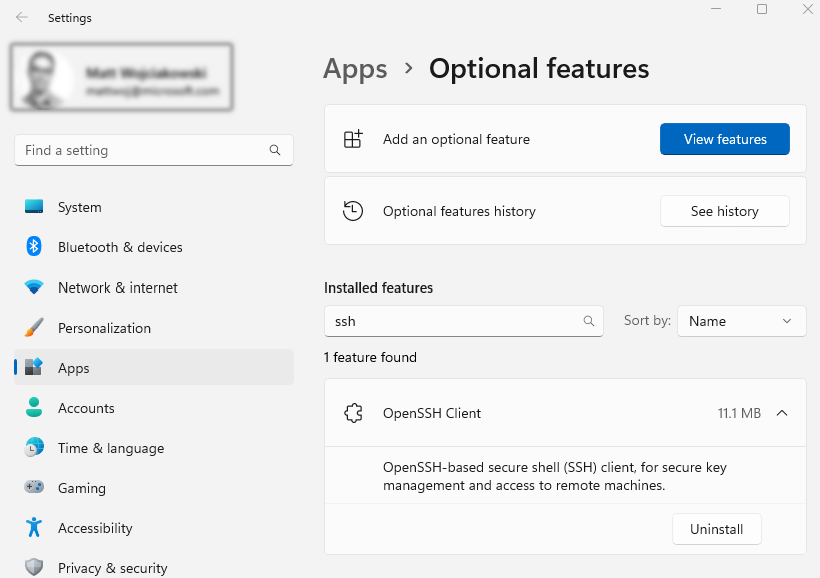
By default, the OpenSSH client will be located in the directory: C:\Windows\System32\OpenSSH. You can also check that it is installed in Windows Settings > Apps > Optional features, then search for “OpenSSH” in your installed features.
PS C:\Users\vdhiman> ssh [email protected]
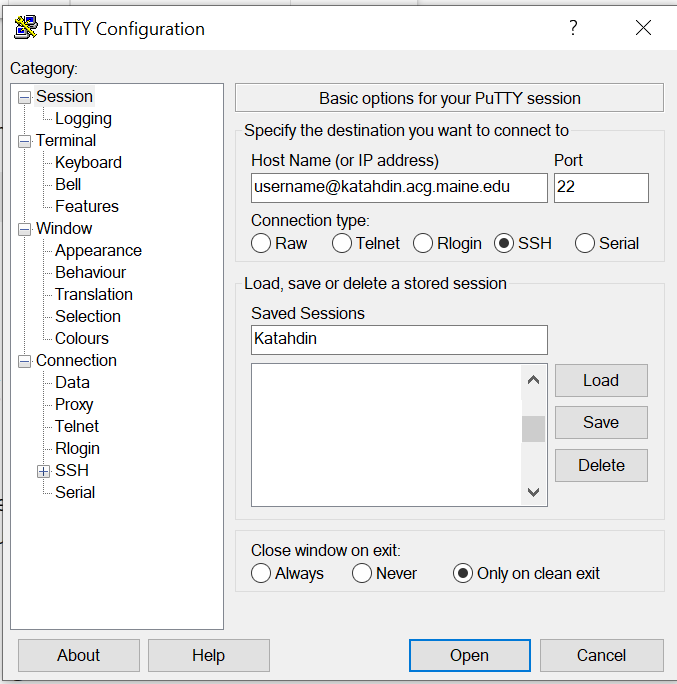
For Windows Putty
Download from here and Full documentation here
Load anaconda3 module
Conda is package and environment management system for Python and other launchages.
Available libraries on acg servers are managed through module. Some modules are loaded by default. You can see what modules are already loaded by using module list.
vdhiman@katahdin:~$ module list

Currently Loaded Modules:
  1) autotools   2) prun/1.3   3) gnu8/8.3.0   4) mvapich2/2.3.2   5) ohpc


vdhiman@katahdin:~$
You can list all the available modules through module avail
vdhiman@katahdin:~$ module avail
--------------------- /opt/ohpc/pub/moduledeps/gnu8-mvapich2 ----------------------
   fftw/3.3.8

-------------------------- /opt/ohpc/pub/moduledeps/gnu8 --------------------------
   R/3.6.1 (D)    hdf5/1.10.5    (D)    openblas/0.3.7
   R/4.1.0        lapack/3.9.1          openblas/0.3.15 (D)
   gsl/2.6        mvapich2/2.3.2 (L)    openmpi3/3.1.4

---------------------------- /opt/ohpc/pub/modulefiles ----------------------------
   2.3.5
   ANSYS/19.2
   EasyBuild/3.9.4
   IGV/2.12.3
   JAGS/4.3.0                                    (D)
   JAGS/4.3.0.1
   OpenFOAM/7.0
   STAR/2.7.5c
   abaqus/2017
   aflow/3.2.5
   aflow/3.2.7                                   (D)
   anaconda2/5.3.1
   anaconda3/2020.07
   anaconda3/2022.10                             (D)
You can search the available modules using either of module avail, module
spider or module keyword
To search for module names that contain the word conda:
vdhiman@katahdin:~$ module avail conda

---------------------------- /opt/ohpc/pub/modulefiles ----------------------------
   anaconda2/5.3.1    anaconda3/2020.07    anaconda3/2022.10 (D)

  Where:
   D:  Default Module

Use "module spider" to find all possible modules.
Use "module keyword key1 key2 ..." to search for all possible modules matching any
of the "keys".


vdhiman@katahdin:~$
Steve has helpfully installed jupyter in anaconda3/2022.10 for ECE490.
We will load anaconda3/2022.10.
vdhiman@katahdin:~$ module load anaconda3/2022.10
vdhiman@katahdin:~$ module list # to check which modules are loaded now


Currently Loaded Modules:
  1) autotools   3) mvapich2/2.3.2   5) gnu8/8.3.0
  2) prun/1.3    4) ohpc             6) anaconda3/2022.10


vdhiman@katahdin:~$
We can see the environment variables modified by the loading of anaconda3
module using module show
vdhiman@katahdin:~$ module show anaconda3
-------------------------------------------------------------------------------
   /opt/ohpc/pub/modulefiles/anaconda3/2022.10:
-------------------------------------------------------------------------------
whatis("Sets up your environment to use Anaconda3 ")
setenv("CONDA_DIR","/opt/ohpc/pub/anaconda3/2022.10")
setenv("CONDA_BIN","/opt/ohpc/pub/anaconda3/2022.10/bin")
setenv("CONDA_INIT","/opt/ohpc/pub/anaconda3/2022.10/bin/conda-init")
setenv("INIT_CONDA",". /opt/ohpc/pub/anaconda3/2022.10/bin/conda-init")
prepend_path("PATH","/opt/ohpc/pub/anaconda3/2022.10/bin")
load("gnu8")
vdhiman@katahdin:~$
Initialize Conda
Conda environment still needs to be initialized. We call $INIT_CONDA to
initialize the environment. We can check which version python and
jupyter are in the PATH.
vdhiman@katahdin:~$ $INIT_CONDA
(base) which python # which python is available?
/opt/ohpc/pub/anaconda3/2022.10/bin/python
(base) which jupyter # which jupyter is available?
/opt/ohpc/pub/anaconda3/2022.10/bin/jupyter
(base)
Run Jupyter notebook
Let’s first check if there are any jupyter notebooks already running. Because if they are, we do not want run a new one.
(base) jupyter notebook list
Currently running servers:
(base)
It is clear that no jupyter notebooks are running. If there was one runnning,
you can stop it with jupyter notebook stop <PORT_NUMBER>.
Let’s start a jupyter notebook.
(base) jupyter notebook --no-browser &
[1] 3985
(base) [I 2023-01-21 17:19:37.889 LabApp] JupyterLab extension loaded from /opt/ohpc/pub/anaconda3/2022.10/lib/python3.9/site-packages/jupyterlab
[I 2023-01-21 17:19:37.889 LabApp] JupyterLab application directory is /opt/ohpc/pub/anaconda3/2022.10/share/jupyter/lab
[I 17:19:37.895 NotebookApp] The port 8888 is already in use, trying another port.
[I 17:19:37.895 NotebookApp] Serving notebooks from local directory: /home/vdhiman
[I 17:19:37.895 NotebookApp] Jupyter Notebook 6.4.12 is running at:
[I 17:19:37.896 NotebookApp] http://localhost:8889/?token=balksajdlfksjdajdskjfslksdfls
[I 17:19:37.896 NotebookApp]  or http://127.0.0.1:8889/?token=balksajdlfksjdajdskjfslksdfls
[I 17:19:37.896 NotebookApp] Use Control-C to stop this server and shut down all kernels (twice to skip confirmation).
[C 17:19:37.901 NotebookApp]

    To access the notebook, open this file in a browser:
        file:///home/vdhiman/.local/share/jupyter/runtime/nbserver-3985-open.html
    Or copy and paste one of these URLs:
        http://localhost:8889/?token=balksajdlfksjdajdskjfslksdfls
     or http://127.0.0.1:8889/?token=balksajdlfksjdajdskjfslksdfls
Pay attention to the number after localhost:. For me it is 8889, for you it
will be different. We will be using this number later. We will call this port
number as REMOTE_PORT. Also save the part after token=. We will call it TOKEN later on.
We cannot access this yet. If katahdin was not firewalled, anyone could have
acessed this by replacing localhost with katahdin.acg.maine.edu. However,
katahdin.acg.maine.edu is firewalled and we cannot access arbitrary ports on
katahdin. Luckily, ssh can help us access with port-forwarding.
TCP/UDP ports
Ports in computer and electrical engineering stands for an input-output interface. When we talk about TCP/UDP ports, the port numbers are software ports that are managed by the operating sytem. However, you can still “imagine” them as connections to the outside world. For example, the default ports for HTTP protocol is 80, HTTPS is 443, for SSH is 22. What does this mean? This means that you can add the correct port number to any URL and it will still work. For example, you can access umaine.edu using https://maine.edu or using https://maine.edu:443. You can access katahdin.acg.maine.edu through ssh by specifying 22 as the port number. This also means that the server side processes “listen” to the assigned port numbers on the server. The “ssh daemon” listens to the port 22, “https server daemon” listens to the port 443 and so on.
You can learn more about this in the COS 440:Computer Networking class or explore on your own.
Port forwarding
We want the communication between our browser and Jupyter notebook server to tunnel through the ssh connection. The information flow for the port forwarding is visualized here:

Port forwarding through SSH can have two sets of instructions:
- MacOS or Windows PowerShell or Linux
- Windows Putty
MacOS or Windows PowerShell or Linux
Log out of the ssh session on katahdin. Press Ctrl+D to logout. We will login again with ssh port forwarding.
You can create a forward any REMOTE_PORT and a LOCAL_PORT using
ssh -L <LOCAL_PORT>:localhost:<REMOTE_PORT> [email protected]
For example, my jupyter notebook printed port 8889 which is my REMOTE_PORT; and I decided to use 8888 as the LOCAL_PORT. You can use any port number greater than 1024 and smaller than 65535 as the LOCAL_PORT.
vdhiman@office-desktop:~$ ssh -L 8888:localhost:8889 [email protected]
Last login: Sat Jan 21 15:58:54 2023 from jx3cth3.um.maine.edu
vdhiman@katahdin:~$
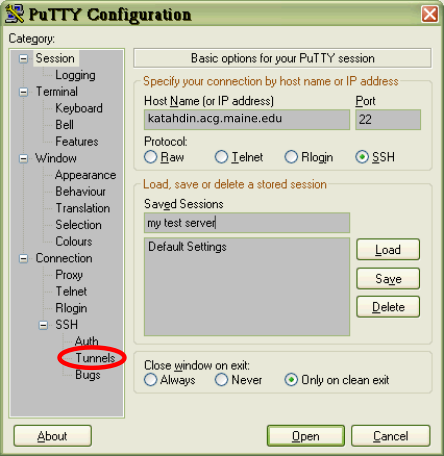
Windows Putty
Log out of the ssh session on katahdin. Press Ctrl+D to logout. We will login again with ssh tunnel.
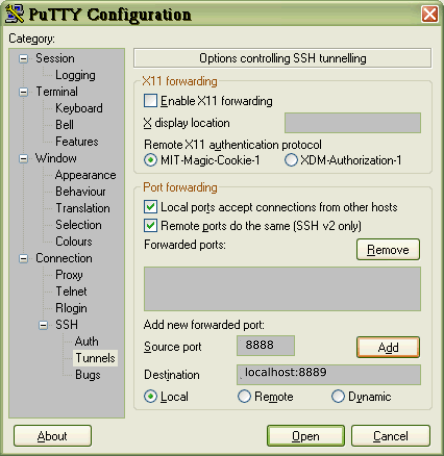
You can create a forward any REMOTE_PORT and a LOCAL_PORT through ssh tunneling. In Putty, load your saved session. And click on “Connection->SSH->Tunnels”
Under “Add new forward port:” add Destination as “localhost:REMOTE_PORT” where
REMOTE_PORT is the same port that was printed by jupyter notebook earlier.
In the “Source port” field add any number between 1025 and 65535.
Then click “Add”.
After adding, the entry should appear in the “Forwarded ports:” area.
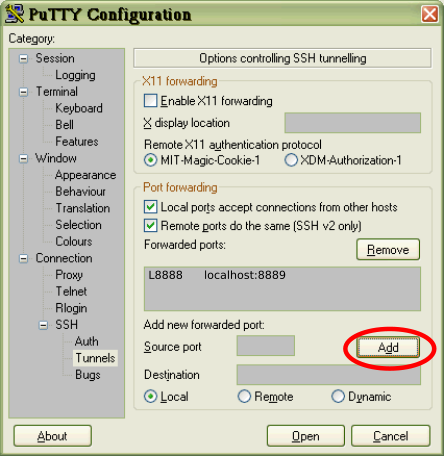
Save the session settings so that this is done every time.
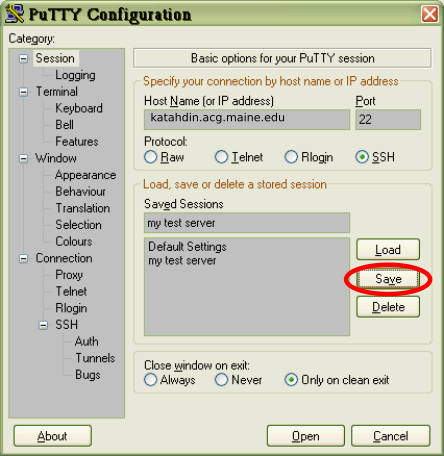
Log back into katahdin by clicking “Open”
Accessing Jupyter notebook on your laptop
Now on your laptop, you can open the Jupyter notebook in your browser http://localhost:8888. Note that here, I used the LOCAL_PORT not the REMOTE_PORT. If everything went alright, then you should should see a password prompt.
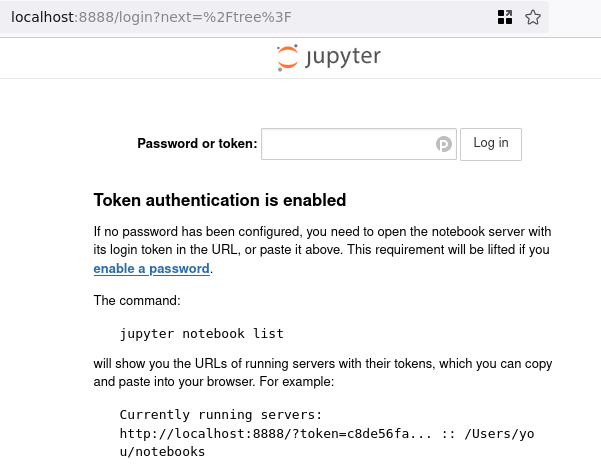
Enter the TOKEN that you saved earlier. If you forgot the token, you can type
jupyter notebook list to get the token.
After entering the token, you should see files in your home directory.
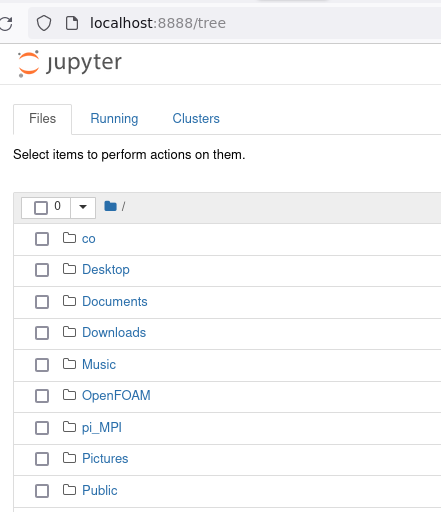
To avoid enterying the TOKEN everytime, you can make it a part of the url by creating a URL similar to what jupyter notebook printed.
http://localhost:8888/?token=<your TOKEN here>
The only difference is that we replaced the REMOTE_PORT with LOCAL_PORT. Recall that you can choose the LOCAL_PORT to be same as the REMOTE_PORT
Uploading Python_1.ipynb
If you have been using Google Colab to work on Python_1.ipynb, you can download the file and Upload it using the “Upload” button.
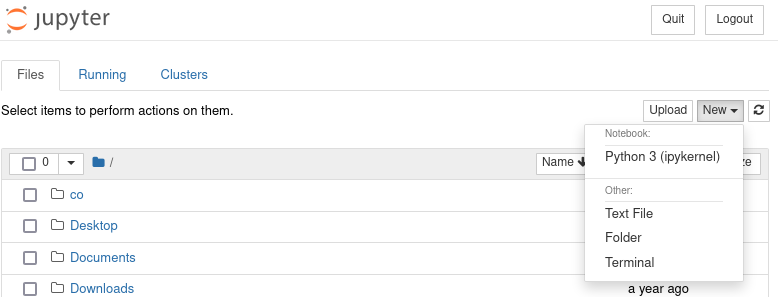
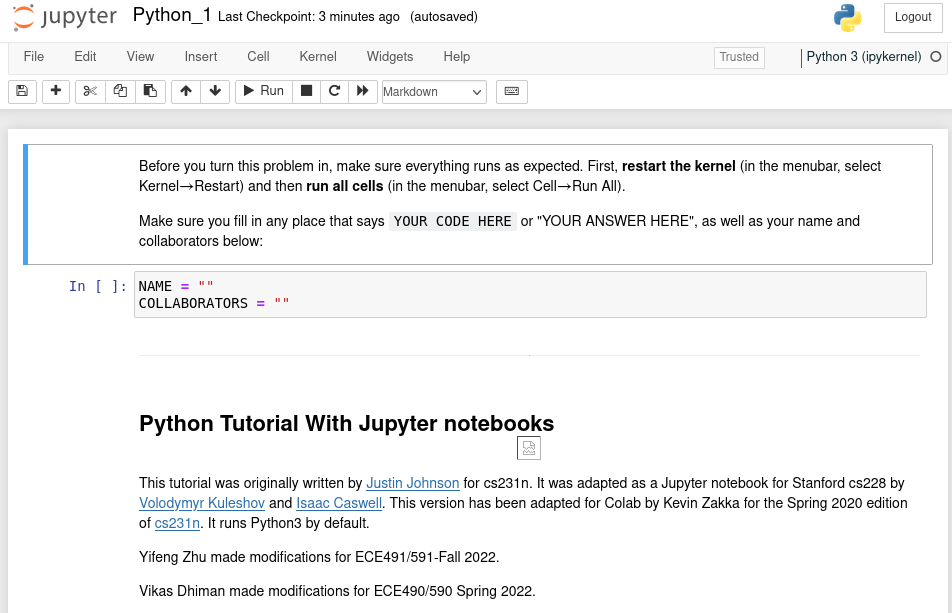
Clicking on any ‘.ipynb’ file will open the notebook in runnable mode.
Alternative Jupyter Lab interface
Apart from Jupyter notebook interface, Jupyter Lab interface is also available
which looks more like an IDE. You can use either. Jupyter Lab interface can
obtained by adding lab after the localhost:8888/. That is
http://localhost:8888/lab