ECE417 Jetbot software setup
This document is a copy of the following sources with minor changes:
Items required
Before you start, you need the following items:
Jetson Nano 4GB
SD Card 32GB or above
SD Card writer
MicroUSB Power supply (or you can connect it to the waveshare board)
USB wifi stick (Comfast).
A laptop or computer
An HDMI monitor
A USB keyboard
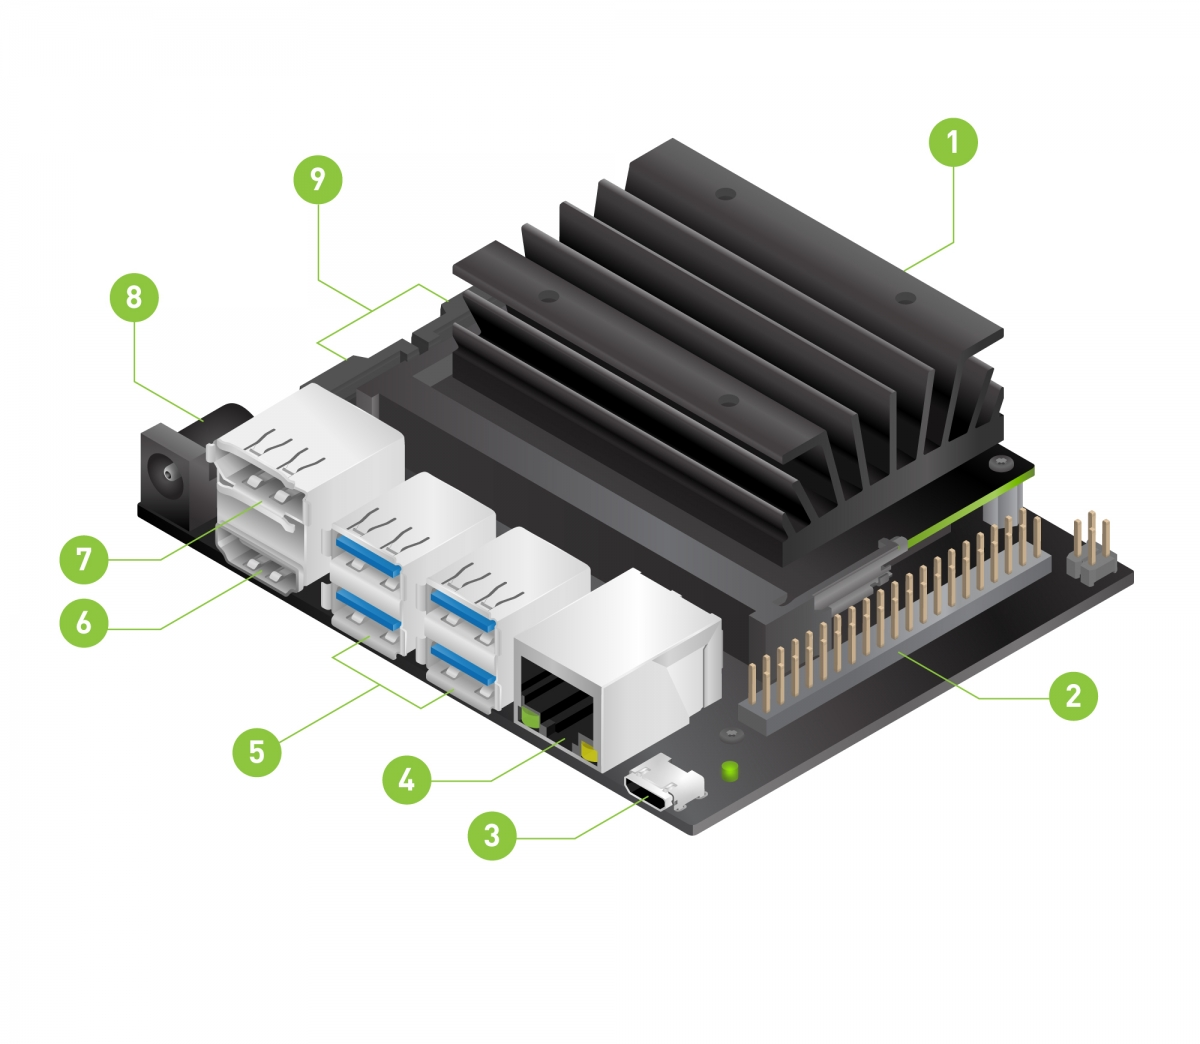
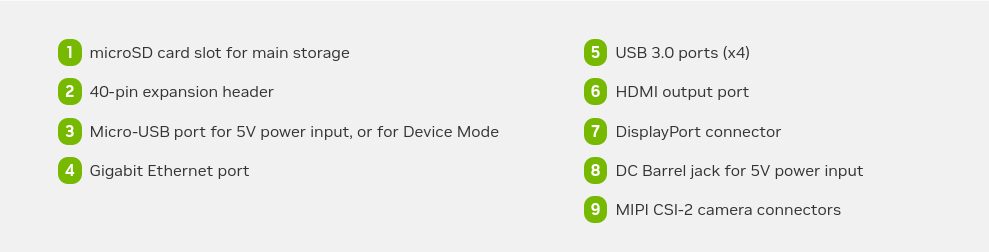
Jetson Nano
Software Setup (SD Card Image)
This page details how to set up JetBot using the pre-built JetBot SD card image. You may prefer this option if you are new to Jetson Nano, and do not have an existing SD card configured.
Step 1 - Download the pre-built JetBot SD card image
Download the pre-built JetBot SD card image from the table below. Make sure to select the version that matches the Jetson you’re using (for example Jetson Nano 4GB)
 .
.
Attention
To use one of the JetBot sdcard images based on JetPack 4.5, you first need to boot your Jetson Nano using a plain JetPack 4.5 SD card image and run through the operating system setup. This will perform a one-time configuration which enables you to use SD card images based on JetPack 4.5 on your device. You can find the original JetPack SD card images here: JetPack SD card image for Jetson Nano 2GB and JetPack SD card image for Jetson Nano (4GB). After doing this procedure once, you can then use the JetPack 4.5 based JetBot SD card images listed above on your device.
Most of you in ECE417 have Jetson Nano 4GB, but some of you have Jetson Nano 2GB. Easiest way to identify them apart is by the number of USB ports. Nano 2GB has USB 2.0 ports (x2), USB 3.0 port (x1). While Nano 4GB has USB 3.0 ports (x4).
Latest Release
| Platform | JetPack Version | JetBot Version | Download | MD5 Checksum |
|---|---|---|---|---|
| Jetson Nano (4GB) | 4.5 | 0.4.3 | jetbot | 760b1885646bfad8590633acca014289 |
| Jetson Nano 2GB | 4.5 | 0.4.3 | jetbot | e6dda4d13b1b1b31f648402b9b742152 |
Step 2 - Flash JetBot image onto SD card
Insert an SD card into your desktop machine
Using BalenaEtcher (or dd), select the image you downloaded above and flash it onto the SD card.
Remove the SD card from your desktop machine
Step 3 - Boot Jetson Nano
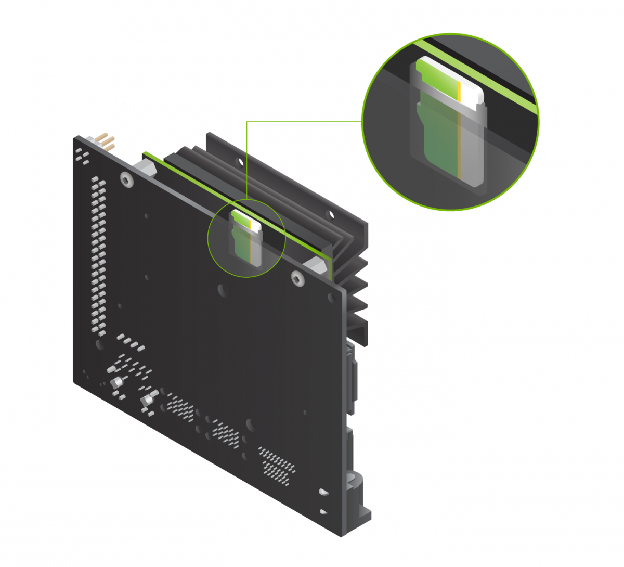
Insert the SD card into your Jetson Nano (the micro SD card slot is located under the module)
Connect the following to Nano:
Comfast USB WiFi adaptor
USB keyboard
USB mouse
HDMI or DVI monitor
Power on the Jetson Nano by connecting the micro USB (for Jetson Nano (4GB)).
Attention
We recommend first booting the Jetson Nano once without the piOLED / motor driver connected. This way you can check to make sure the system boots properly from the SD card image without worrying about hardware issues. After you’ve verified that it boots, reconnect the piOLED, double check your wiring, and boot again.
However, this will require you to power Jetson Nano with microUSB. If you don’t have that, power it using the waveshare driver board.Status check:
After boot, you should see the following messages on the monitor:
| Ubuntu 18.04.5 LTS nano-4gb-jp45 tty1 nano-4gb-jp45 login: |
|---|
Type jetbot as login, press enter and jetbot as password. After login, you can change the password using the passwd command.
You will also see error messages “tegra-i2c … no acknowledge from address 0x3c”. Ignore these for now. These should disappear once we connect to the waveshare board.
Step 4 - Connect JetBot to medev WiFi
Next you’ll need to connect to WiFi. To reduce memory consumption, we disable the Ubuntu GUI in the latest JetBot SD card image. For this reason, you’ll need to use the command line to connect to WiFi.
Log in using the user jetbot and password jetbot
Use nmtui to connect to medev wifi. Use password:
pskdev@ums
Then press escape to quit.Find out the hardware MAC address using the following command
cat /sys/class/net/wlan0/addressUMaine Specific: Register the device from your laptop or phone here
For medev register here: https://forms .gle /8oTt2sbXVQB6F43h9 Use the MAC address from step 3
Once you have entered the mac address, email the professor, IT department will have to whitelist the MAC address to connect to medev
Status check
Check 1: Once medev assigns us an IP address, we should be able to connect to the internet. This can take a few minutes. You can check the ip address using ifconfig command
jetbot@nano-4gb-jp45:~$ ifconfig wlan0
wlan0: flags=4163<UP,BROADCAST,RUNNING,MULTICAST>  mtu 1500
inet <red>141.114.204.99</red>  netmask 255.255.248.0  broadcast 141.114.207.255
inet6 fe80::437b:610f:866d:ba6  prefixlen 64  scopeid 0x20<link>
ether b0:4f:13:07:52:8a  txqueuelen 1000  (Ethernet)
RX packets 11549292  bytes 6265183425 (6.2 GB)
RX errors 0  dropped 0  overruns 0  frame 0
TX packets 3082997  bytes 1266491173 (1.2 GB)
TX errors 0  dropped 0 overruns 0  carrier 0  collisions 0
The number next to inet separated by 3 dots is your IPv4 address. It is a decimal representation of a 4-byte number where each byte is represented by a decimal number between 0-255. It should change from 10.14.xxx.xxx something to 141.114.xxx.xxx once medev assigns you a public address.
Check 2: You can check if you can connect to google.com by using ping
jetbot@nano-4gb-jp45:~$ ping google.com
PING google.com (142.251.40.238) 56(84) bytes of data.
64 bytes from lga34s39-in-f14.1e100.net (142.251.40.238): icmp_seq=1 ttl=120 time=15.1 ms
64 bytes from lga34s39-in-f14.1e100.net (142.251.40.238): icmp_seq=2 ttl=120 time=15.1 ms
64 bytes from lga34s39-in-f14.1e100.net (142.251.40.238): icmp_seq=3 ttl=120 time=15.1 ms
^C
--- google.com ping statistics --- 3 packets transmitted, 3 received, 0% packet loss, time 2003ms rtt min/avg/max/mdev = 15.075/15.103/15.132/0.023 ms
Kill the process using Ctrl+C. If you are not connected to the internet, you should just see the first line and not the second line.
Check 3: You should also confirm your public ip address using any website that provides such a service. One such website is ifconfig.me.
jetbot@nano-4gb-jp45:~$ wget ifconfig.me -O - 2>/dev/null
141.114.204.99jetbot@nano-4gb-jp45:~$
Note the public IP address of your device.
In the following instructions replace IP address of my jetbot 141.114.204.99 with your own jetbot’s IP address.
*Check 4:* You should be able to ssh to your jetbot from your laptop:vdhiman@office-desktop:~$ ssh [email protected]
The authenticity of host '141.114.204.99 (141.114.204.99)' can't be established.
ECDSA key fingerprint is SHA256:IoAgrDFGF+o1CyU+12i4N6FZgUPrW/ZvPFnY24kUKQ4.
Are you sure you want to continue connecting (yes/no/[fingerprint])? ye
s
Warning: Permanently added '141.114.204.99' (ECDSA) to the list of known hosts.
[email protected]'s password:
Welcome to Ubuntu 18.04.5 LTS (GNU/Linux 4.9.201-tegra aarch64)
* Documentation: https://help.ubuntu.com
* Management: https://landscape.canonical.com
* Support: https://ubuntu.com/advantage
This system has been minimized by removing packages and content that are
not required on a system that users do not log into.
To restore this content, you can run the 'unminimize' command.
0 packages can be updated.
0 of these updates are security updates.
Last login: Thu Jan 28 20:56:46 2021
jetbot@nano-4gb-jp45:~$Check 5: You should be able to open a jupyter notebook from a web browser. On your laptop, open the following link:
Step 5 - Connect to JetBot from web browser
After your robot is connected to WiFi, you no longer need to have the robot connected by a monitor. You can connect to the robot from your laptop’s web browser by performing the following steps
Shutdown JetBot using the command line
sudo shutdown now
Unplug your HDMI monitor, USB keyboard, mouse and power supply from Jetson Nano
Power the JetBot from the USB battery pack by plugging in the micro-USB cable
Wait a bit for JetBot to boot
Check the IP address of your robot on the piOLED display screen. Enter this in place of
<jetbot_ip_address>in the next commandNavigate to
http://<jetbot_ip_address>:8888from your desktop’s web browser. You can do this from any machine on your local network.Sign in using the password
jetbot.
That’s it, you’ve now accessed JetBot’s remote programming environment!
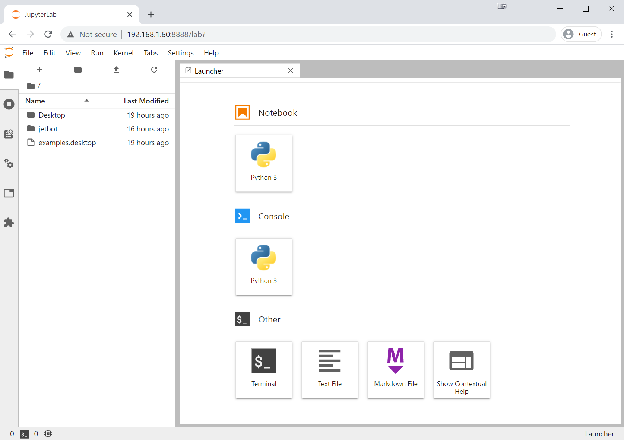
Here you can easily access the JetBot examples! From this point on, when you power on the JetBot, it should automatically connect to WiFi and display its IP address. So all you need to do is reconnect using your web browser to start programming!
Now that you’re finished setting up your JetBot, you’re ready to run the examples.
Step 6: Use the full sdcard size
The sdcard image is much smaller than your sdcard full size. Let’s fix that. First on the your laptop let’s ssh to jetbot. Replace <jetbot_ip_address> with the IP address of the Jetbot displayed on OLED display.
ece417@laptop:~$ ssh jetbot@<jetbot_ip_address>Install cloud-guest-utils on jetbot
jetbot@nano-4gb-jp45:~$ sudo apt update
jetbot@nano-4gb-jp45:~$ sudo apt install cloud-guest-utils
List the bulk storage devices
jetbot@nano-4gb-jp45:~$ lsblk
NAME         MAJ:MIN RM   SIZE RO TYPE MOUNTPOINT
loop0          7:0    0    16M  1 loop
mtdblock0     31:0    0     4M  0 disk
mmcblk0      179:0    0 119.1G  0 disk
├─mmcblk0p1  179:1    0  24.4G  0 part /
├─mmcblk0p2  179:2    0   128K  0 part
├─mmcblk0p3  179:3    0   448K  0 part
├─mmcblk0p4  179:4    0   576K  0 part
├─mmcblk0p5  179:5    0    64K  0 part
├─mmcblk0p6  179:6    0   192K  0 part
├─mmcblk0p7  179:7    0   384K  0 part
├─mmcblk0p8  179:8    0    64K  0 part
├─mmcblk0p9  179:9    0   448K  0 part
├─mmcblk0p10 179:10   0   448K  0 part
├─mmcblk0p11 179:11   0   768K  0 part
├─mmcblk0p12 179:12   0    64K  0 part
├─mmcblk0p13 179:13   0   192K  0 part
└─mmcblk0p14 179:14   0   128K  0 part
Looks like mmcblk0 is the device that is our SD Card. List the partition number for /dev/mmcblk0
jetbot@nano-4gb-jp45:~$ sudo parted /dev/mmcblk0 print
Model: SD SN128 (sd/mmc)
Disk /dev/mmcblk0: 128GB
Sector size (logical/physical): 512B/512B
Partition Table: gpt
Disk Flags:
Number  Start   End     Size    File system  Name     Flags
 2      1049kB  1180kB  131kB                TBC
 3      2097kB  2556kB  459kB                RP1
 4      3146kB  3736kB  590kB                EBT
 5      4194kB  4260kB  65.5kB               WB0
 6      5243kB  5439kB  197kB                BPF
 7      6291kB  6685kB  393kB                BPF-DTB
 8      7340kB  7406kB  65.5kB               FX
 9      8389kB  8847kB  459kB                TOS
10      9437kB  9896kB  459kB                DTB
11      10.5MB  11.3MB  786kB                LNX
12      11.5MB  11.6MB  65.5kB               EKS
13      12.6MB  12.8MB  197kB                BMP
14      13.6MB  13.8MB  131kB                RP4
 1      14.7MB  26.2GB  26.2GB  ext4         APP
Partition 1 contains 26.2GB of space. Grow the partition 1 on /dev/mmcblk0 to take up the full space. growpart is one of the utility to extend the last partition of the disk to fill the available free space on the disk. It changes the sector position to the end sector of the disk.
jetbot@nano-4gb-jp45:~$ sudo growpart /dev/mmcblk0 1
CHANGED: partition=1 start=28672 old: size=51200000 end=51228672 new: size=249708511,end=249737183
Does parted show the change
jetbot@nano-4gb-jp45:~$ sudo parted /dev/mmcblk0 print
Model: SD SN128 (sd/mmc)
Disk /dev/mmcblk0: 128GB
Sector size (logical/physical): 512B/512B
Partition Table: gpt
Disk Flags:
Number  Start   End     Size    File system  Name     Flags
 2      1049kB  1180kB  131kB                TBC
 3      2097kB  2556kB  459kB                RP1
 4      3146kB  3736kB  590kB                EBT
 5      4194kB  4260kB  65.5kB               WB0
 6      5243kB  5439kB  197kB                BPF
 7      6291kB  6685kB  393kB                BPF-DTB
 8      7340kB  7406kB  65.5kB               FX
 9      8389kB  8847kB  459kB                TOS
10      9437kB  9896kB  459kB                DTB
11      10.5MB  11.3MB  786kB                LNX
12      11.5MB  11.6MB  65.5kB               EKS
13      12.6MB  12.8MB  197kB                BMP
14      13.6MB  13.8MB  131kB                RP4
 1      14.7MB  128GB   128GB   ext4         APP
Partition table and filesystem are different things. Resize the filesystem to match the partition table for partition 1 on /devmmcblk0 . The
resize2fsprogram will resize ext2, ext3, or ext4 file systems. If the filesystem is mounted, it can be used to expand the size of the mounted filesystem, assuming the kernel supports on-line resizing.
jetbot@nano-4gb-jp45:~$ sudo resize2fs /dev/mmcblk0p1
resize2fs 1.44.1 (24-Mar-2018)
Filesystem at /dev/mmcblk0p1 is mounted on /; on-line resizing required
old_desc_blocks = 2, new_desc_blocks = 8
The filesystem on /dev/mmcblk0p1 is now 31213563 (4k) blocks long.
Make sure that
df -h .shows you the expected size of the sdcard. Two related commands that every system administrator runs frequently are df and du. “While du reports files’ and directories’ disk usage, df reports how much disk space your filesystem is using. The df command displays the amount of disk space available on the filesystem with each file name’s argument.”[1]
jetbot@nano-4gb-jp45:~$ df -h . Filesystem Size Used Avail Use% Mounted on /dev/mmcblk0p1 118G 22G 91G 20% / Step 7: Get ROS humble on jetbot
We will not install ROS using our usual process because the ubuntu in Jetpack is 18.04 while we need 22.04 for ROS humble. We will solve this problem by using docker which is like a lightweight virtual machine but unlike a virtual machine it uses the same kernel. In fact, in simple cases of docker, the only thing that differs between the host and the guest is the filesystem (the files that you see when you inside docker).
Please read and understand docker concepts like container, image, registry etc.
jetbot@nano-4gb-jp45:~$ sudo docker pull vdhiman86/ros:humble-pytorch-l4t-r32.7.1
..
Status: Downloaded newer image for vdhiman86/ros:humble-pytorch-l4t-r32.7.1            docker.io/vdhiman86/ros:humble-pytorch-l4t-r32.7.1
Once it is downloaded you can run the docker image to create a running container. Find out about these concepts in a docker tutorial
jetbot@nano-4gb-jp45:~$ sudo docker run --name ros-talker --network host -v /home/jetbot:/home/jetbot -v /etc/passwd:/etc/passwd -v /etc/shadow:/etc/shadow -v /etc/group:/etc/group -u $(id -u) --workdir /home/jetbot -it vdhiman86/ros:humble-pytorch-l4t-r32.7.1 bash
sourcing   /opt/ros/humble/install/setup.bash
ROS_DISTRO humble
ROS_ROOT   /opt/ros/humble
jetbot@nano-4gb-jp45:/$
Now you are inside a running docker container.
Here’s a description of each option
--name ros-talker : Give this container a name. I decided to call it ros-talker
--network host: There are several options for connecting to the internet in docker, host mode is the easiest.
-v : This binds the directory on the host to the container. We want the /home/jetbot inside docker as it is. We also want the jetbot user to be available inside docker, so we bind the user information in /etc/passwd , /etc/shadow and /etc/group to the container.
-u : Specify the user using which you want to login to the docker container. We want to use the current user which is given by the id -u command. Enclosing the command inside $( ) runs that command and replaces it with its output.
--workdir /home/jetbot : Change directory to /home/jetbot after starting the container.
-it : Run the container in an interactive -i mode with a terminal attached -t .
vdhiman86/ros:humble-pytorch-l4t-r32.7.1 : is the name of the image that should be run as a container
bash is the first command to run inside the container to keep it running. Once the command completes, the container will stop running. It will still be there and not deleted though.
Exiting the container
If you exit the container using CTRL-D , then container stops and you can rerun the same container using
jetbot@nano-4gb-jp45:~/ece417$ sudo docker container start -i ros-talker
sourcing   /opt/ros/humble/install/setup.bash
ROS_DISTRO humble
ROS_ROOT   /opt/ros/humble
jetbot@nano-4gb-jp45:~/ece417$
If you exit the container using CTRL-P CTRL-Q, then container keeps running in the background and you can attach again to the same container session using
jetbot@nano-4gb-jp45:~/ece417$ sudo docker container attach ros-talker
jetbot@nano-4gb-jp45:~/ece417$