ECE417: First ROS nodes
Getting Linux on Windows
In windows command line type the following command to set the WSL version to 2.
wsl --set-default-version 2List all the linux distributions available online for install through wsl
wsl --list --onlineWe will install 2022 version of Ubuntu 22.04
wsl --install -d Ubuntu-22.04Make sure it is wsl2 by typing
wsl --set-default-version 2 -d Ubuntu-22.04Start Ubuntu by typing
wsl -d Ubuntu-22.04Understanding Data Distribution Service and Discovery
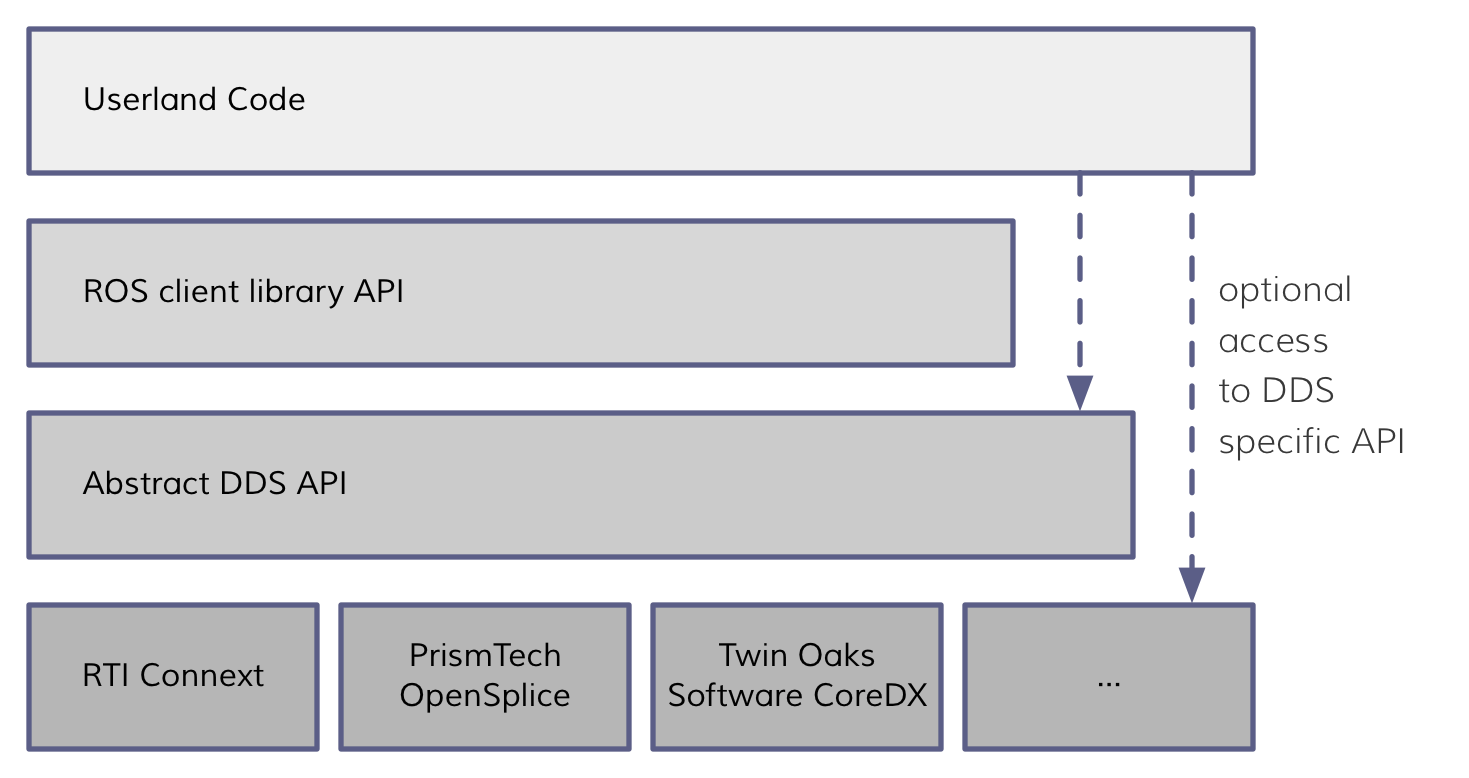
We are using Eclipse Cyclone DDS 0.7.0 for DDS with description of options here.
When you are deploying robots, it is better for them to be together on the same subnetwork. DDS can find robots using “simple discovery” when they are on the same subnetwork. Since our robot and laptop are on a separate subnetwork.
Subnetwork : A subnetwork or subnet is a logical subdivision of an IP network.
laptop:~/ece417$ ifconfig wlan0
wlan0: flags=4163<UP,BROADCAST,RUNNING,MULTICAST>  mtu 1500
   	 inet 141.114.195.160  netmask 255.255.248.0  broadcast 141.114.199.255
   	 inet6 fe80::f67:d239:daf9:bdf6  prefixlen 64  scopeid 0x20<link>
   	 ether 20:0d:b0:4d:40:b5  txqueuelen 1000  (Ethernet)
   	 RX packets 980  bytes 1106777 (1.1 MB)
   	 RX errors 0  dropped 0  overruns 0  frame 0
   	 TX packets 521  bytes 63464 (63.4 KB)
   	 TX errors 0  dropped 0 overruns 0  carrier 0  collisions 0
A IPv4 subnet is determined by netmask which is a 32-bit binary mask over 32-bit IP address. The masked bits are fixed, the unmasked bits form the range of IP addresses in the subnet. For example, netmask for tempest Wi-Fi is 255.255.248.0 which allows for masking for all bits in IP address except the last 11 bits. All IP addresses in the range 141.114.192-200.0-256 are in the same subnet as 141.114.195.160.
Creating ROS talker listener between jetbot and laptop
0. Installing the ROS environment
Before following these instructions, you need to install ROS on your laptop on WSL by following the instructions here:
https://
Source the ROS environment
ROS allows you to talk between process. A lot of talking between processes is governed by environment variables. In linux you can see all the environment variables and their values by running
laptop:~/ece417$ printenvThe problem with printenv is that it prints all environment variables, and there are a lot of them. Linux allows you to filter out a command output by using `| grep <filterwords>`. We want to see environment variables that contain the word ROS
laptop:~/ece417$ printenv | grep ROS
laptop:~/ece417$
By default, there is no environment variable regarding ROS. We can source environment files that initialize ROS related environment variables.
laptop:~/ece417$ source /opt/ros/humble/setup.bashNow check environment variables with the word ROS again, you should see the following.
laptop:~/ece417$ printenv | grep ROS
ROS_VERSION=2
ROS_PYTHON_VERSION=3
ROS_LOCALHOST_ONLY=0
ROS_DISTRO=humble
Each environment variable can be modified, and it communicates with all the processes that you will run later on. For example, you can access environment variables inside python as:
laptop:~/ece417$ python3 -c 'import os; print(os.getenv("ROS_DISTRO"))'
humble
You have to run source /opt/ros/humble/setup.bash in every terminal once before you use any ros command. You can also add it your ~/.bashrc which contains all the commands that are run at the beginning of every shell session.
Run your first ROS node
Ros nodes are run using `ros2 run` command. It takes two arguments, first is the ROS package name. And second is the executable in the package, in the format `ros2 run <packagename> <executable>`.
laptop:~/ece417$ ros2 run demo_nodes_py listenerHere we run the listener executable from the demo_nodes_py package. Let it run in this terminal. Open a new terminal for the next steps.
Inspect what nodes are running.
Open a new terminal and run source /opt/ros/humble/setup.bash again, unless you have added it your ~/.bashrc . You can list all the running nodes with
laptop:~/ece417$ ros2 node list
/listener
Here /listener is the node name. All names in ROS can form a hierarchy which starts with a forward slash `/`. Valid node names can be `/listeners/student1`
Run the talker node
Run the talker node in the package name demo_nodes_py using the same template as “Run your first node section.”
laptop:~/ece417$ # What command should you run to a node talker in package demo_nodes_py
[INFO] [1695169878.688667829] [talker]: Publishing: "Hello World: 0"
[INFO] [1695169879.668149723] [talker]: Publishing: "Hello World: 1"
[INFO] [1695169880.668166943] [talker]: Publishing: "Hello World: 2"
[INFO] [1695169881.668083244] [talker]: Publishing: "Hello World: 3
Switch to the listener terminal and you should see the listener receiving the messages.
laptop:~/ece417$ ros2 run demo_nodes_py listener
[INFO] [1695169971.080665762] [listener]: I heard: [Hello World: 0]
[INFO] [1695169972.049128144] [listener]: I heard: [Hello World: 1]
[INFO] [1695169973.048824633] [listener]: I heard: [Hello World: 2]
[INFO] [1695169974.049025512] [listener]: I heard: [Hello World: 3]
[INFO] [1695169975.048981828] [listener]: I heard: [Hello World: 4]
[INFO] [1695169976.049040151] [listener]: I heard: [Hello World: 5]
[INFO] [1695169977.049155199] [listener]: I heard: [Hello World: 6]
Let the two terminals talk to each other while we inspect what is going on in a new terminal.
More introspection
Source the ROS environment in the new terminal. What nodes are running. List the nodes that are running from “Inspect what nodes are running section.”
laptop:~/ece417$ # What command sources the environment variables and you have to run everytime
laptop:~/ece417$ # What command lists all the running nodes
/listener
/talker
You can also visualize a graph of all the nodes using
laptop:~/ece417$ rqt_graph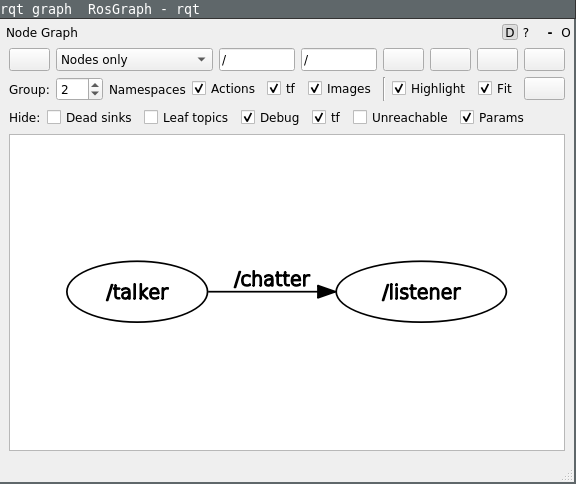
Sometimes you might have to stop and start the ros2 daemon to make this work.
laptop:~/ece417$ ros2 daemon stop
laptop:~/ece417$ ros2 daemon start
List all the topic
Similar to listing all the nodes, you can also list all the topics (metaphors: telephone line/channels/information pipelines between nodes).
laptop:~/ece417$ ros2 topic list
/chatter /parameter_events /rosout
Here /chatter is the name of the topic on which /talker and /listener are chatting. You can get more information about the topic using ros2 topic info
laptop:~/ece417$ ros2 topic info /chatter Type: std\_msgs/msg/String Publisher count: 1 Subscription count: 1You can see what else `ros2 topic` has to offer by asking for help
laptop:~/ece417$ ros2 topic -h
usage: ros2 topic [-h] [--include-hidden-topics]
              	Call `ros2 topic <command> -h` for more detailed usage. ...

Various topic related sub-commands

optional arguments:
  -h, --help        	show this help message and exit
  --include-hidden-topics
                    	Consider hidden topics as well

Commands:
  bw 	Display bandwidth used by topic
  delay  Display delay of topic from timestamp in header
  echo   Output messages from a topic
  find   Output a list of available topics of a given type
  hz 	Print the average publishing rate to screen
  info   Print information about a topic
  list   Output a list of available topics
  pub	Publish a message to a topic
  type   Print a topic's type
Try out a few of these
laptop:~/ece417$ ros2 topic hz /chatter
average rate: 1.000     	min: 1.000s max: 1.000s std dev: 0.00025s window: 2
laptop:~/ece417$ ros2 topic echo /chatter
data: 'Hello World: 496'
---
data: 'Hello World: 497'
---
data: 'Hello World: 417'laptop:~/ece417$ ros2 topic bw /chatter
Subscribed to [/chatter]
35 B/s from 2 messages
Message size mean: 28 B min: 28 B max: 28 B
32 B/s from 3 messages
Message size mean: 28 B min: 28 B max: 28 BConfigure Wireguard VPN tunnel
Configuring Wireguard VPN tunnel between the laptop and the robot has the following advantages
Sends encrypted messages between the laptop and the robot, making the communication private and secure
One of the peers (the robot or the laptop) must have a public IP address. Once a connection is established, both the robot and the laptop can communicate, even if one is behind a NAT router.
Built-in roaming: Once the connection is established all peers including the initial peer that had a public IP address can change their IP addresses.
“WireGuard associates tunnel IP addresses with public keys and remote endpoints. When the interface sends a packet to a peer, it does the following:
This packet is meant for 192.168.30.8. Which peer is that? Let me look... Okay, it’s for peer
ABCDEFGH. (Or if it’s not for any configured peer, drop the packet.)Encrypt entire IP packet using peer
ABCDEFGH’s public key.What is the remote endpoint of peer
ABCDEFGH? Let me look... Okay, the endpoint is UDP port 53133 on host 216.58.211.110.Send encrypted bytes from step 2 over the Internet to 216.58.211.110:53133 using UDP.
When the interface receives a packet, this happens:
I just got a packet from UDP port 7361 on host 98.139.183.24. Let’s decrypt it!
It decrypted and authenticated properly for peer
LMNOPQRS. Okay, let’s remember that peerLMNOPQRS’s most recent Internet endpoint is 98.139.183.24:7361 using UDP.Once decrypted, the plain-text packet is from 192.168.43.89. Is peer
LMNOPQRSallowed to be sending us packets as 192.168.43.89?If so, accept the packet on the interface. If not, drop it.”[1]
Please watch this excellent video for public/private key cryptography.
Install wireguard on both laptop and jetbot. Also create a directory ~/.config/wg/
laptop:~/ece417$ sudo apt update
laptop:~/ece417$ sudo apt install wireguard
Same on the jetbot:
jetbot@nano-4gb-jp45:~$ sudo apt update
jetbot@nano-4gb-jp45:~$ sudo apt install wireguard
Create wireguard private keys for both laptop and jetbot.
laptop:~/ece417$ mkdir -p ~/.config/wg
laptop:~/ece417$ cd ~/.config/wg
laptop:~/.config/wg$ wg genkey > private.key
laptop:~/.config/wg$ chmod 0660 private.key
laptop:~/.config/wg$ cat private.key
<this will print laptop_wireguard_privatekey>
Create wireguard private keys on jetbot
jetbot@nano-4gb-jp45:~/ece417$ mkdir -p ~/.config/wg
jetbot@nano-4gb-jp45:~/ece417$ cd ~/.config/wg
jetbot@nano-4gb-jp45:~/.config/wg$ wg genkey > private.key
jetbot@nano-4gb-jp45:~/.config/wg$ chmod 0660 private.key
jetbot@nano-4gb-jp45:~/.config/wg$ cat private.key
<this will print jetbot_wireguard_privatekey>
Do not repeat the above commands. You do not want to generate new private keys once they are generated.
To get jetbot’s public key, run the following on the jetbot in the ~/.config/wg directory
jetbot@nano-4gb-jp45:~/.config/wg$ wg pubkey < private.key
<this will print jetbot_wireguard_publickey>
Replace <jetbot_wireguard_publickey> with the output of the above command.
Replace <jetbot_ip_address> with the IP address of jetbot as seen on the OLED display.
Create a file ~/.config/wg/wg0.conf on the laptop with the following contents:
[Interface]
Address = 10.0.0.3/24
PrivateKey = <laptop_wireguard_privatekey>


[Peer]
PublicKey = <jetbot_wireguard_publickey>
AllowedIPs = 10.0.0.2/32
PersistentKeepalive = 25
Endpoint = <jetbot_ip_addres>:51820
Create a symmetrical file on the jetbot but with minor differences:
laptop:~/.config/wg$ wg pubkey < private.key
<this will print laptop_wireguard_publickey>
Repeat the same on the jetbot.
[Interface]
Address = 10.0.0.2/24
PrivateKey = <jetbot_wireguard_privatekey>
ListenPort = 51820

[Peer]
PublicKey = <laptop_wireguard_publickey>
AllowedIPs = 10.0.0.3/32
PersistentKeepalive = 25
Note the additional ListenPort = line and the absence of the Endpoint = line.
Explanations:
Interface>Address: A new set of IP addresses that will be assigned to wireguard to deal with. The first number is the new IP address this computer will assigned in the wireguard VPN.
Interface>ListenPort: Listen for connections on this port
Peer>AllowedIPs: This set of IP addresses are allowed as this peer.
Peer>EndPoint: This peer has a ‘ListenPort’ at this particular IP address and port. Try connecting there first.
Peer>PersisitentKeepAlive: Keep sending fake data every 25s for the connection to be reset due to the robot being behind a NAT router.
Bring up the wireguard on the laptop
laptop:~/.config/wg$ chmod 0660 wg0.conf
laptop:~/.config/wg$ sudo wg-quick up ./wg0.conf
[#] ip link add wg0 type wireguard
[#] wg setconf wg0 /dev/fd/63
[#] ip -4 address add 10.0.0.3/24 dev wg0
[#] ip link set mtu 1420 up dev wg0
You should see an additional interface in the output of ifconfig command
laptop:~/.config/wg$ ifconfig
…
wg0: flags=209<UP,POINTOPOINT,RUNNING,NOARP>  mtu 1420
    	inet 10.0.0.3  netmask 255.255.255.0  destination 10.0.0.3
    	unspec 00-00-00-00-00-00-00-00-00-00-00-00-00-00-00-00  txqueuelen 1000  (UNSPEC)
    	RX packets 1  bytes 92 (92.0 B)
    	RX errors 0  dropped 0  overruns 0  frame 0
    	TX packets 3  bytes 212 (212.0 B)
    	TX errors 0  dropped 0 overruns 0  carrier 0  collisions 0
Check the status of wireguard with wg show
laptop:~/.config/wg$ sudo wg show
interface: wg0
  public key: tQ39QO5530z2tv73dzVQXVfFbKEEKn1l/lpFXK4aW3w=
  private key: (hidden)
  listening port: 51820

peer: G4Y7wwnJhrQUqafFC7PXp1C1NqADQNcp0dwRBYrp0DI=
  endpoint: 141.114.195.160:51820
  allowed ips: 10.0.0.2/32
  persistent keepalive: every 25 seconds
Repeat the same commands on jetbot
jetbot@nano-4gb-jp45:~/.config/wg$ chmod 0660 wg0.conf
jetbot@nano-4gb-jp45:~/.config/wg$ sudo wg-quick up ./wg0.conf
[#] ip link add wg0 type wireguard
[#] wg setconf wg0 /dev/fd/63
[#] ip -4 address add 10.0.0.2/24 dev wg0
[#] ip link set mtu 1420 up dev wg0
jetbot@nano-4gb-jp45:~/.config/wg$ sudo wg show
interface: wg0
  public key: G4Y7wwnJhrQUqafFC7PXp1C1NqADQNcp0dwRBYrp0DI=
  private key: (hidden)
  listening port: 51820

peer: tQ39QO5530z2tv73dzVQXVfFbKEEKn1l/lpFXK4aW3w=
  endpoint: 130.111.219.79:51820
  allowed ips: 10.0.0.3/32
  latest handshake: 1 minute, 17 seconds ago
  transfer: 212 B received, 156 B sent
  persistent keepalive: every 25 seconds
Make sure the public key of the laptop is jetbot’s peer and vice-versa. If your wireguard is not working, it either of the two things (1) the public keys do not match, or (2) the endpoint is not correct.
Going forward, the only thing you might need to change is the endpoint if the
IP address of If you make changes to wg0.conf, you will need to restart wireguard using
sudo wg-quick down wg0 followed by sudo wg-quick up ./wg0.conf.
If everything went right, then you should be able to access jetbot via 10.0.0.2 and laptop via 10.0.0.3. From the laptop try
laptop:~/.config/wg$ ping 10.0.0.2
PING 10.0.0.2 (10.0.0.2) 56(84) bytes of data.
64 bytes from 10.0.0.2: icmp_seq=1 ttl=64 time=2.06 ms
64 bytes from 10.0.0.2: icmp_seq=2 ttl=64 time=2.10 ms
From the jetbot try
laptop:~/.config/wg$ ping 10.0.0.3
PING 10.0.0.2 (10.0.0.2) 56(84) bytes of data.
64 bytes from 10.0.0.3: icmp_seq=1 ttl=64 time=2.06 ms
64 bytes from 10.0.0.3: icmp_seq=2 ttl=64 time=2.10 ms
You can even ssh to jetbot using 10.0.0.2
laptop:~/.config/wg$ ssh [email protected]You can also open jupyter lab running on jetbot from the new IP address http://
Another check to make sure UDP packets from jetbot can reach the laptop run netcat in UDP listen mode on the port 7410
laptop:~/.config/wg$ netcat -u -l 10.0.0.3 7410On the jetbot run netcat in UDP send mode and then type hello and press enter
jetbot@nano-4gb-jp45:~$ netcat -u 10.0.0.3 7410
hello
You should see hello on the laptop end. If this does not work, then you have some firewall issues.
Make this wireguard configuration permanent so that this happens every time the robot boots up.
jetbot@nano-4gb-jp45:~/.config/wg$ sudo cp wg0.conf /etc/wireguard/wg0.conf
jetbot@nano-4gb-jp45:~/.config/wg$ sudo systemctl enable [email protected]
Repeat the same on the laptop, if you prefer. I prefer to manually start wg on my laptop because it contains the IP address of the jetbot as Endpoint which might change.
Configuring Initial Peers list
We are going to switch to Eclipse Cyclone DDS 0.7.0 instead of using eProsima Fast DDS. The closest documentation is here. CycloneDDS is already installed on the jetbot, you have to install it on the laptop.
laptop:~/ece417$ sudo apt update
laptop:~/ece417$ sudo apt install ros-humble-rmw-cyclonedds-cpp
To tell ROS that we are going to use a different Ros MiddleWare, use the RMW_IMPLEMENTATION environment variable,
laptop:~/ece417$ export RMW_IMPLEMENTATION=rmw_cyclonedds_cppCheck all the ROS related environment variables we have learned so far,
laptop:~/ece417$ printenv | grep -E "ROS|RMW_IMPLEMENTATION"
ROS_VERSION=2
ROS_PYTHON_VERSION=3
ROS_LOCALHOST_ONLY=0
ROS_DISTRO=humble
RMW_IMPLEMENTATION=rmw_cyclonedds_cpp
We have to type these commands a lot, so let’s add them to our setup.bash and create an alias for the printenv | grep command. Create setup.bash with following lines:
source /opt/ros/humble/setup.bash
export RMW_IMPLEMENTATION=rmw_cyclonedds_cpp
alias rosenv='printenv | grep -E "ROS|RMW_IMPLEMENTATION"'
laptop:~/ece417$ source setup.bash
laptop:~/ece417$ rosenv
ROS_VERSION=2
ROS_PYTHON_VERSION=3
ROS_LOCALHOST_ONLY=0
ROS_DISTRO=humble
RMW_IMPLEMENTATION=rmw_cyclonedds_cppWireguard does not support multicast, so we have to setup initial peer list on the CycloneDDS configuration file. Create a file called cyclonedds.xml
<?xml version="1.0" encoding="UTF-8" ?>
<CycloneDDS xmlns="https://cdds.io/config"
    xmlns:xsi="http://www.w3.org/2001/XMLSchema-instance"
    xsi:schemaLocation="https://cdds.io/config
                        https://raw.githubusercontent.com/eclipse-cyclonedds/cyclonedds/master/etc/cyclonedds.xsd">
	<Domain id="any">
  	<Discovery>
    	<Peers>
      	<!--Peer address="10.0.0.1" ></Peer-->
      	<Peer address="10.0.0.2" ></Peer>
      	<Peer address="10.0.0.3" ></Peer>
    	</Peers>
  	</Discovery>
    	<General>
        	 <Interfaces><NetworkInterface name="wg0"/></Interfaces>
    	</General>
    	<Tracing>
        	<Verbosity>config</Verbosity>
        	<OutputFile>${HOME}/.ros/cyclonedds.log.${CYCLONEDDS_PID}</OutputFile>
    	</Tracing>
	</Domain>
</CycloneDDS>
We have overridden the Peer list, NetworkInterface and verbosity level for debugging purposes. Tell rmw_cyclconedds_cpp middleware about the location of this configuration file using another environment variable
laptop:~/ece417$ export CYCLONEDDS_URI="file://$(pwd)/cyclonedds.xml"Add this to the setup.bash as well
source /opt/ros/humble/setup.bash
export RMW_IMPLEMENTATION=rmw_cyclonedds_cpp
alias rosenv='printenv | grep -E "ROS|RMW_IMPLEMENTATION"'
export CYCLONEDDS_URI="file://$(pwd)/cyclonedds.xml"
alias rosenv='printenv | grep -E "ROS|RMW_IMPLEMENTATION|CYCLONEDDS_URI"'
Copy the setup.bash and cyclonedds.xml files to the jetbot and create a docker container using the ros image that we pulled earlier.
laptop:~/ece417$ scp setup.bash cyclonedds.xml [email protected]:~/ece417jetbot@nano-4gb-jp45:~/ece417$ sudo docker container rm ros-humble
jetbot@nano-4gb-jp45:~/ece417$ sudo docker run --name ros-humble --network host -v /home/jetbot:/home/jetbot -v /etc/passwd:/etc/passwd -v /etc/shadow:/etc/shadow -v /etc/group:/etc/group -u $(id -u) --ipc host --privileged --workdir /home/jetbot/ece417 -it dustynv/ros:humble-pytorch-l4t-r32.7.1 bash
sourcing /opt/ros/humble/install/setup.bash
ROS_DISTRO humble
ROS_ROOT /opt/ros/humbleOn Jetbot the location of ros setup.bash is different. It is /opt/ros/humble/install/setup.bash instead of /opt/ros/humble/setup.bash. Change that in the setup.bash
source /opt/ros/humble/install/setup.bash
export RMW_IMPLEMENTATION=rmw_cyclonedds_cpp
alias rosenv='printenv | grep -E "ROS|RMW_IMPLEMENTATION"'
export CYCLONEDDS_URI="file://$(pwd)/cyclonedds.xml"
alias rosenv='printenv | grep -E "ROS|RMW_IMPLEMENTATION|CYCLONEDDS_URI"'
Now you should be able to source it.
jetbot@nano-4gb-jp45:~/ece417$ source setup.bashNow ros node talker and listener between jetbot and the laptop must be able to talk to each other.
laptop:~/ece417$ ros2 run demo_nodes_py listenerjetbot@nano-4gb-jp45:~/ece417$ ros2 run demo_nodes_py talker