Jetbot camera
Jetbot camera is connected to the Jetson Nano by Camera Serial Interface (CSI) connector. CSI protocol was developed by Mobile Industry Processor Interface (MIPI), hence sometimes specified as MIPI-CSI. CSI is typically faster than USB.
| USB | MIPI CSI |
|---|---|
| 400 MB/s | 320 MB/s/lane 1280 MB/s (with 4 lanes) |
| < 5 meters | <30 cm |
| High | Low |
| Plug-and-play | Connect at boot time |
| Low | Medium to High |
| Generic drivers | Platform specific drivers |
Nvidia CSI camera drivers
Sources: 1. https://
Nvidia provides CSI drivers for Jetson Nano through the Libargus camera api. The main command line utility is
jetbot@nano-4gb-jp45:~/ece417$ nvgstcapture-1.0 --mode 1 --automate --capture-auto
laptop:~/ece417$ scp [email protected]:~/ece417/*.jpg .Gstreamer
Gstreamer allows you to compose pipelines to capture and modify video and audio streams.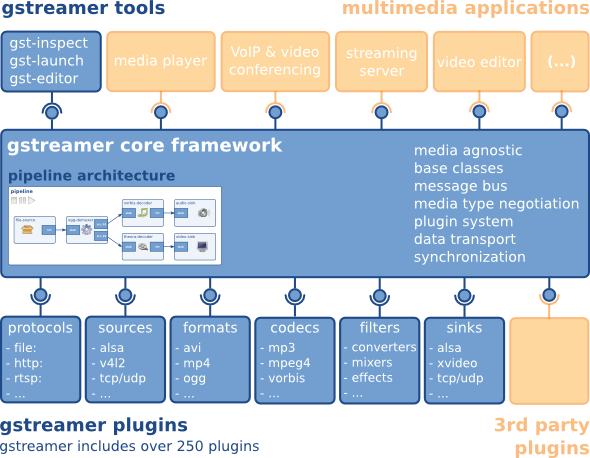 NVargus library provides gstreamer plugins. Let’s see if they work inside and outside docker. Let’s first try outside docker using the command that nvidia documentation recommends.
jetbot@nano-4gb-jp45:~/ece417$ mkdir data
jetbot@nano-4gb-jp45:~/ece417$ cd data
jetbot@nano-4gb-jp45:~/ece417/data$ gst-launch-1.0 nvarguscamerasrc num-buffers=3000 ! 'video/x-raw(memory:NVMM),width=1920, height=1080, framerate=30/1, format=NV12' ! omxh264enc ! qtmux ! filesink location=test.mp4 -e
The command will capture num-buffers=3000 using nvarguscamerasrc with the given resolution, encode it in h264 format (omxh264enc), followed by Quicktime converter (qtmux) and filesink plugin to save the video to the file. The above command should save the test.mp4 file inside the current directory (~/ece417/data). Copy the file to your laptop and view it to make sure that video capture worked.
laptop:~/ece417$ scp [email protected]:~/ece417/data/*.mp4 .
laptop:~/ece417$ xdg-open test.mp4
Now let’s try the same inside the docker container that we created earlier.
jetbot@nano-4gb-jp45:~/ece417/data$ docker container start -ia ros-humble
root@nano-4gb-jp45:/home/jetbot/ece417# cd data/
root@nano-4gb-jp45:/home/jetbot/ece417/data# gst-launch-1.0 nvarguscamerasrc num-buffers=3000 ! 'video/x-raw(memory:NVMM),width=1920, height=1080, framerate=30/1, format=NV12' ! omxh264enc ! qtmux ! filesink location=test.mp4 -e
Again copy the video and check if the captured video looks correct.
The long string 'video/x-raw(memory:NVMM),width=1920, height=1080, framerate=30/1, format=NV12' is called a Capabilities Filter. If multiple capabilities are available in the source or the destination (called the sink); then Caps filter filters out the desired capability. The available capabilities can be listed by using the gst-inspect-1.0 command. Try it for nvarguscamerasrc
jetbot@nano-4gb-jp45:~/ece417/ws/src$ gst-inspect-1.0 nvarguscamerasrc
…
Pad Templates:
  SRC template: 'src'
    Availability: Always
    Capabilities:
      video/x-raw(memory:NVMM)
                  width: [ 1, 2147483647 ]
                 height: [ 1, 2147483647 ]
                 format: { (string)NV12 }
              framerate: [ 0/1, 2147483647/1 ]
…
ROS camera node
There exists a gscam ROS node that wraps around gstreamer. Let’s try that one out as a camera source in ROS message format. Clone the gscam repository in the ws/src on jetbot.
jetbot@nano-4gb-jp45:~/ece417/ws/src$ git clone --branch ros2 https://github.com/ros-drivers/gscamBuild the workspace with --symlink-install option. It allows you to edit the files without having to run colcon build every time.
jetbot@nano-4gb-jp45:~/ece417/ws$ docker container start -ia ros-humble
sourcing   /opt/ros/humble/install/setup.bash
ROS_ROOT   /opt/ros/humble
ROS_DISTRO humble
root@nano-4gb-jp45:/home/jetbot/ece417# source setup.bash
root@nano-4gb-jp45:/home/jetbot/ece417# cd ws/
root@nano-4gb-jp45:/home/jetbot/ece417/ws# colcon build --symlink-install
Colcon build creates an install/setup.bash file that needs to be sourced to get the installed packages.
root@nano-4gb-jp45:/home/jetbot/ece417/ws# source install/setup.bashAt this stage you can add source ws/install/setup.bash to your project setup.bash instead of source /opt/ros/humble/install.setup.bash. Now my setup.bash looks like this:
source ws/install/setup.bash
export RMW_IMPLEMENTATION=rmw_cyclonedds_cpp
export CYCLONEDDS_URI="file://$(pwd)/cyclonedds.xml"
alias rosenv='printenv | grep -E "ROS|RMW_IMPLEMENTATION|AMENT|CYCLONEDDS_URI"'
Using GSCAM node to publish images
Look at the example launch files for the gscam node. All the gstreamer pipelines for the node end in ffmpegcolorspace which was renamed to videoconvert plugin in gstreamer 1.0. ROS nodes work with raw images, that’s why we do not need to convert(encode) it to H264 format or package it in Quicktime format. We are going to remove those gstreamer plugins and run the gstreamer ROS node without the omxh264enc, qtmux or the filesync. Instead we are going to end the stream with videoconvert. However, we have to match the Capabilities of the videoconvert with the capabilities of nvarguscamerasrc. Let’s check the capabilities of videoconvert
jetbot@nano-4gb-jp45:~/ece417/ws# gst-inspect-1.0 videoconvert
.
.
.
Pad Templates:
  SINK template: 'sink'
    Availability: Always
    Capabilities:
      video/x-raw
                 format: { (string)I420, (string)YV12, (string)YUY2, (string)UYVY, (string)AYUV, (string)RGBx, (string)BGRx, (string)xRGB, (string)xBGR, (string)RGBA, (string)BGRA, (string)ARGB, (string)ABGR, (string)RGB, (string)BGR, (string)Y41B, (string)Y42B, (string)YVYU, (string)Y444, (string)v210, (string)v216, (string)NV12, (string)NV21, (string)GRAY8, (string)GRAY16_BE, (string)GRAY16_LE, (string)v308, (string)RGB16, (string)BGR16, (string)RGB15, (string)BGR15, (string)UYVP, (string)A420, (string)RGB8P, (string)YUV9, (string)YVU9, (string)IYU1, (string)ARGB64, (string)AYUV64, (string)r210, (string)I420_10BE, (string)I420_10LE, (string)I422_10BE, (string)I422_10LE, (string)Y444_10BE, (string)Y444_10LE, (string)GBR, (string)GBR_10BE, (string)GBR_10LE, (string)NV16, (string)NV24, (string)NV12_64Z32, (string)A420_10BE, (string)A420_10LE, (string)A422_10BE, (string)A422_10LE, (string)A444_10BE, (string)A444_10LE, (string)NV61, (string)P010_10BE, (string)P010_10LE, (string)IYU2, (string)VYUY, (string)GBRA, (string)GBRA_10BE, (string)GBRA_10LE, (string)GBR_12BE, (string)GBR_12LE, (string)GBRA_12BE, (string)GBRA_12LE, (string)I420_12BE, (string)I420_12LE, (string)I422_12BE, (string)I422_12LE, (string)Y444_12BE, (string)Y444_12LE, (string)GRAY10_LE32, (string)NV12_10LE32, (string)NV16_10LE32 }
                  width: [ 1, 2147483647 ]
                 height: [ 1, 2147483647 ]
              framerate: [ 0/1, 2147483647/1 ]
.
.
.
This does not match that of nvarguscamerasrc. Hence, we have to use nvvidconv gstreamer plugin. According to the documentation, “The NVIDIA proprietary nvvidconv Gstreamer-1.0 plug-in allows conversion between OSS (raw) video formats and NVIDIA video formats.”
Hence, the minimal ROS run command for gscam_node from inside the docker container is,
root@nano-4gb-jp45:/home/jetbot/ece417# ros2 run gscam gscam_node --ros-args -p gscam_config:="nvarguscamerasrc sensor-id=0 ! video/x-raw(memory:NVMM), width=(int)640, height=(int)360, framerate=10/1, format=(string)NV12 ! nvvidconv ! videoconvert"Context: on jetbot, in docker container
On the laptop, you can visualize the images using either rviz2 or rqt_iamge_view
laptop:~/ece417# ros2 run rqt_image_view rqt_image_viewFor rviz2, start rviz2, click on “Add” in the display panel, (2) Click “By topic” (3) Click “/camera/image_raw”>Image.
laptop:~/ece417# rviz2Fixing the warnings
There are several warnings and errors about the camera calibration file and No camera frame_id. We can fix those warnings in the next steps.
Adding camera calibration
Create a file called ~/csi_cam_640x360.ini with following contents on jetbot. This file was created using camera_calibration process . The camera calibration parameters are specific to a particular resolution. If you want to use a different resolution, you have to do the camera calibration again.
# oST version 5.0 parameters

[image]

width
640

height
360

[default]

camera matrix
395.086544 0.000000 343.416245
0.000000 395.599826 188.318197
0.000000 0.000000 1.000000

distortion
-0.311061 0.085598 -0.000239 0.001480 0.000000

rectification
1.000000 0.000000 0.000000
0.000000 1.000000 0.000000
0.000000 0.000000 1.000000

projection
298.174957 0.000000 357.625519 0.000000
0.000000 366.286163 189.056921 0.000000
0.000000 0.000000 1.000000 0.000000
Copy the camera calibration file into the ws/src/gscam/examples directory
root@nano-4gb-jp45:/home/jetbot/ece417/ws# cp /home/jetbot/csi_cam_640x360.ini src/gscam/examples/Provide the camera_info_url parameter with the newly created camera
calibration file.
root@nano-4gb-jp45:/home/jetbot/ece417/ws# ros2 run gscam gscam_node --ros-args -p gscam_config:="nvarguscamerasrc sensor-id=0 ! video/x-raw(memory:NVMM), width=(int)640, height=(int)360, framerate=10/1, format=(string)NV12 ! nvvidconv ! videoconvert" -p camera_name:=default -p camera_info_url:=package://gscam/examples/csi_cam_640x360.ini -p frame_id:=/v4l_frame -p sync_sink:=trueCreate a launch file
Launch files are ways to launch ROS nodes with all the arguments written into a file ws/src/gscam/examples/nvcsi.launch.xml in XML format. This avoids the need to write type long command line instructions. The following launch file is equivalent to running the ros node with above command line arguments. Launch files can also contain multiple nodes, as well as other launch files, which is very useful in creating ROS systems with 100s of nodes.
<launch>
  <node name="any_name_you_like_1" pkg="gscam" exec="gscam_node" output="screen">
    <param name="camera_name" value="default"/>
    <param name="camera_info_url" value="package://gscam/examples/csi_cam_640x360.ini"/>
    <param name="gscam_config" value="nvarguscamerasrc sensor-id=0 ! video/x-raw(memory:NVMM), width=(int)640, height=(int)360, framerate=10/1, format=(string)NV12 ! nvvidconv ! videoconvert"/>
    <param name="frame_id" value="/v4l_frame"/>
    <param name="sync_sink" value="true"/>
  </node>
</launch>
Run colcon build again to copy (link) the launch file to the install folder.
root@nano-4gb-jp45:/home/jetbot/ece417/ws# colcon build --symlink-installYou can run a launch file by using ros2 launch instead of ros2 run
root@nano-4gb-jp45:/home/jetbot/ece417/ws# ros2 launch gscam nvcsi.launch.xml
Press <Ctrl+P><Ctrl+Q> to detach
View the images on laptop using rviz2
laptop:~/ece417$ source setup.bash
laptop:~/ece417$ rviz2
ARUCO detector
Git clone ROS ARUCO detector repository from fictionlab:
jetbot@nano-4gb-jp45:~/ece417/ws/src$ git clone https://github.com/fictionlab/ros_aruco_opencv/ --branch humbleNow my ws/src contains four repositories
jetbot@nano-4gb-jp45:~/ece417/ws/src$ ls
gscam  jetbot_ros  py_pubsub  ros_aruco_opencv
Add the set_property(TARGET ${PROJECT_NAME} PROPERTY CXX_STANDARD 14) line to the ws/src/ros_aruco_opencv/aruco_opencv/CMakeLists.txt file
--- a/aruco_opencv/CMakeLists.txt
+++ b/aruco_opencv/CMakeLists.txt
@@ -25,6 +25,7 @@ target_link_libraries(${PROJECT_NAME}
   opencv_aruco
   ${YAML_CPP_LIBRARIES}
 )
+set_property(TARGET ${PROJECT_NAME} PROPERTY CXX_STANDARD 14)
 ament_target_dependencies(${PROJECT_NAME}
   aruco_opencv_msgs
   rclcpp_components
Print the ARuCO markers using this file aruco
Launch a new shell to the ros-humble container
jetbot@nano-4gb-jp45:~/ece417/ws$ docker container exec -it ros-humble bashInstall the dependencies for ros_aruco_opencv
root@nano-4gb-jp45:~/ece417# apt update
root@nano-4gb-jp45:~/ece417# apt install libyaml-cpp-dev
Colcon build the workspace
root@nano-4gb-jp45:~/ece417# source setup.bash
root@nano-4gb-jp45:~/ece417# cd ws
root@nano-4gb-jp45:~/ece417/ws# colcon build --symlink-install
Press CTRL-D to exit
Make sure that the gscam_node that you started earlier is still running in the background.
jetbot@nano-4gb-jp45:~/ece417$ docker container ls -a
CONTAINER ID        IMAGE                                      COMMAND                  CREATED             STATUS              PORTS               NAMES
8c3b52eaf5db        vdhiman86/ros:humble-pytorch-l4t-r32.7.1   "/bin/bash"              About an hour ago   Up 39 minutes
The ros topic for /camera/image_raw should be published.
jetbot@nano-4gb-jp45:~/ece417$ docker container exec -it ros-humble bash
root@nano-4gb-jp45:/home/jetbot/ece417# source setup.bash
root@nano-4gb-jp45:/home/jetbot/ece417# ros2 topic list
.
/camera/camera_info
/camera/image_raw
/camera/image_raw/compressed
/camera/image_raw/compressedDepth
/parameter_events
/rosout
Then run the aruco_tracker_autostart node with correct cam_base_topic, marker_size of 0.05 meters and marker_dict of 4x4_50
root@nano-4gb-jp45:/home/jetbot/ece417# ros2 run aruco_opencv aruco_tracker_autostart --ros-args -p cam_base_topic:=camera/image_raw -p marker_size:=0.05 -p marker_dict:=4X4_50On the laptop you should be able to visualize the marker detection using rviz2 on the topic /aruco_tracker/debug
Convert the above command into a launch file
<launch>
  <node name="any_name_you_like" pkg="aruco_opencv" exec="aruco_tracker_autostart" output="screen">
    <param name="cam_base_topic" value="camera/image_raw"/>
    <param name="marker_size" value="0.05"/>
    <param name="marker_dict" value="4X4_50"/>
  </node>
</launch>
On the laptop, run rviz2, (2) Click “Add” in the display panel, (3) Click “By topic” (3) Click “/aruoco_tracker/debug”>Image.
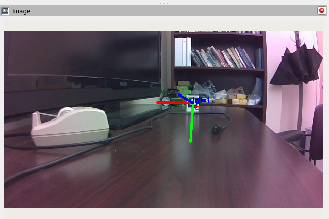
Also (1) Click “Add” in the display panel (2) Under “By Display type” click “TF” to see the transform.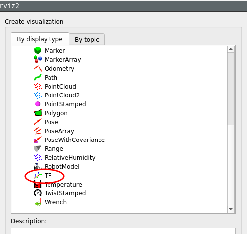
Creating backup of files
We have created a lot of files on jetbot. And jetbot is not a reliable storage device. We will create a backup copy of the ~/ece417 directory on the jetbot to the laptop using rsync. Install rsync and then copy it to a desired directory on the laptop.
laptop:~/ece417/$ sudo apt install rsync
laptop:~/ece417/$ rsync -rcavz [email protected]:~/ece417/ jetbot-ece417/
Repeat this as frequently as you feel up to (at least once a day). Those who use git should fork the repositories and commit frequently.
Editing files on laptop and sending them to jetbot
This also tells us a way to use our favorite Python editor on our laptop and send the code back to jetbot, using:
laptop:~/ece417/$ rsync -rcavz jetbot-ece417/ [email protected]:~/ece417/If you get permission denied errors, change ownership (chown) of all files to jetbot:jetbot
laptop:~/ece417/$ rsync -rcavz jetbot-ece417/ [email protected]:~/ece417/Moving the robot based on distance from ARUCO marker
Create a launch file to launch three nodes, gscam_node, aruco_tracker_autostart and motors_waveshare.
<launch>
<node name="gscam_driver_nvgst" pkg="gscam" exec="gscam_node" output="screen">
    <param name="camera_name" value="default"/>
    <param name="camera_info_url" value="package://py_pubsub/launch/csi_cam_640x360.ini"/>
    <param name="gscam_config" value="nvarguscamerasrc sensor-id=0 ! video/x-raw(memory:NVMM), width=(int)640, height=(int)360, framerate=10/1, format=(string)NV12 ! nvvidconv ! videoconvert"/>
    <param name="frame_id" value="/v4l_frame"/>
    <param name="sync_sink" value="true"/>
</node>

<node name="aruco_opencv" pkg="aruco_opencv" exec="aruco_tracker_autostart" output="screen"
>
    <param name="cam_base_topic" value="/camera/image_raw"/>
    <param name="marker_size" value="0.05"/>
    <param name="marker_dict" value="4X4_50"/>
</node>
<node pkg="jetbot_ros" exec="motors_waveshare" name="motors_waveshare" >
</node>
</launch>
Copy the camera calibration file to py_pubsub launch directory.
jetbot@nano-4gb-jp45:~/ece417/ws/src$ cp gscam/examples/csi_cam_640x360.ini py_pubsub/launch/Take the `generate_data_files` function from jetbot_ros/setup.py and use it copy the launch files from py_pubsub/launch directory.
from setuptools import setup
import os
from itertools import chain

package_name = 'py_pubsub'


def generate_data_files(dirs):
    """
    Generate recursive list of data files, without listing directories in the output.
    """
    data_files = []
    for path, _, files in chain.from_iterable(os.walk(dir) for dir in dirs):
        install_dir = os.path.join('share', package_name, path)
        list_entry = (install_dir,
                      [os.path.join(path, f) for f in files if not f.startswith('.')])
        data_files.append(list_entry)
    return data_files

setup(
    name=package_name,
    version='0.0.0',
    packages=[package_name],
    data_files=[
        ('share/ament_index/resource_index/packages',
            ['resource/' + package_name]),
        ('share/' + package_name, ['package.xml']),
    ] + generate_data_files(['launch']),
    install_requires=['setuptools'],
    zip_safe=True,
    maintainer='root',
    maintainer_email='[email protected]',
    description='TODO: Package description',
    license='TODO: License declaration',
    tests_require=['pytest'],
    entry_points={
        'console_scripts': [
            'talker = py_pubsub.publisher_member_function:main',
            'listener = py_pubsub.subscriber_member_function:main',
        ],
    },
)
Make sure all ros-humble container is stopped
jetbot@nano-4gb-jp45:~/ece417$ docker container ls -a
CONTAINER ID        IMAGE                                      COMMAND                  CREATED             STATUS                       PORTS               NAMES
8c3b52eaf5db        vdhiman86/ros:humble-pytorch-l4t-r32.7.1   "/bin/bash"              2 hours ago         Exited (127) 7 seconds ago                       ros-humble
If it is not “Exited”, stop it using docker container stop ros-humble
jetbot@nano-4gb-jp45:~/ece417$ docker container stop ros-humble
ros-humble
Colcon build inside the docker container
jetbot@nano-4gb-jp45:~/ece417/ws/src$ docker container start -ia ros-humble
root@nano-4gb-jp45:~/ece417$ source setup.bash
root@nano-4gb-jp45:~/ece417$ cd ws
root@nano-4gb-jp45:~/ece417/ws$ colcon build --symlink-install
root@nano-4gb-jp45:~/ece417/ws$ source install/setup.bash
Launch
root@nano-4gb-jp45:~/ece417/ws$ ros2 launch py_pubsub aruco_astar_motors.launch.xml

…
<Press Ctrl-P Ctrl-Q to detach from docker>
Check on laptop
laptop:~/ece417/ws$ ros2 node list
/aruco_opencv
/gscam_driver_nvgst
/jetbot/motors_waveshare
laptop:~/ece417/ws$ ros2 topic list
/aruco_detections
/aruco_opencv/debug
/aruco_opencv/transition_event
/camera/camera_info
/camera/image_raw
/camera/image_raw/compressed
/camera/image_raw/compressedDepth
/jetbot/cmd_vel
/parameter_events
/rosout
/tfDive deep into the /aruco_detections message in another terminal inside the docker container
jetbot@nano-4gb-jp45:~/ece417# docker container exec -it ros-humble bash
root@nano-4gb-jp45:/home/jetbot/ece417# source setup.bash
Print the topic info and full message /aruco_detection message once.
root@nano-4gb-jp45:/home/jetbot/ece417# ros2 topic info /aruco_detections
Type: aruco_opencv_msgs/msg/ArucoDetection
Publisher count: 1
Subscription count: 0
root@nano-4gb-jp45:/home/jetbot/ece417# ros2 topic echo --once /aruco_detections
header:
  stamp:
    sec: 1727998810
    nanosec: 924374790
  frame_id: /v4l_frame
markers:
- marker_id: 1
  pose:
    position:
      x: 0.08918172498053901
      y: -0.10849999597426438
      z: 0.980432215194246
    orientation:
      x: -0.02973468393320003
      y: 0.9811997541144667
      z: -0.03227342049856023
      w: -0.18793966432455353
boards: []
---
The /aruco_detection message is of type aruco_opencv_msgs/msg/ArucoDetection . It is described in this ArucoDetction.msg, MarkerPose.msg, and then Pose.msg. Each message contains a list of detected markers as field markers . Each element in the list contains a marker_id and a pose. Marker_id is the ID of the detected marker in among the markers, while pose contains the 3D position and 3D orientation of the marker. The 3D orientation is represented as a quarternion.
Control the Jetbot
Modify the minimal publisher_subscriber from the 04-First ROS Nodes to publish motor commands based on how far you are from the ARUCO markers.
Copy from here (please read and understand the code, ask questions if you dont understand): docs
Add the new script as a console_script to setup.py. Full file here.
<keep_rest_of_the_file>
    tests_require=['pytest'],
    entry_points={
        'console_scripts': [
            'talker = py_pubsub.publisher_member_function:main',
            'listener = py_pubsub.subscriber_member_function:main',
            'move2aruco = py_pubsub.move2aruco:main',
        ],
    },
<keep_rest_of_the_file>
Run it on the jetbot inside the docker container
jetbot@nano-4gb-jp45:~/ece417/ws/src$ docker container exec -it ros-humble bash
root@nano-4gb-jp45:~/ece417$ source setup.bash
root@nano-4gb-jp45:~/ece417$ ros2 run py_pubsub move2aruco
The robot should rotate and move in the direction of the ARUCO marker if it is visible.